XGR Builder 729 — Complete User Guide
This guide explains how to use Builder 729 to create, visualize, and deploy XRC-729 orchestrations (OSTCs). It covers the canvas-based flow editor, node operations, spawn/join connections, and the deployment workflow.
1) What Builder 729 Does
Builder 729 is a visual editor for creating XRC-729 orchestrations. An orchestration defines a multi-step workflow where each step references an XRC-137 rule contract. Steps can:
- Spawn other steps (parallel or sequential execution)
- Join multiple execution paths back together
- Define onValid and onInvalid branches
The builder provides a canvas-based interface where you can:
- Add and arrange workflow nodes
- Connect nodes with spawn and join relationships
- Load and assign XRC-137 rules to each step
- Deploy the orchestration to the blockchain
2) The Main Interface
What you see
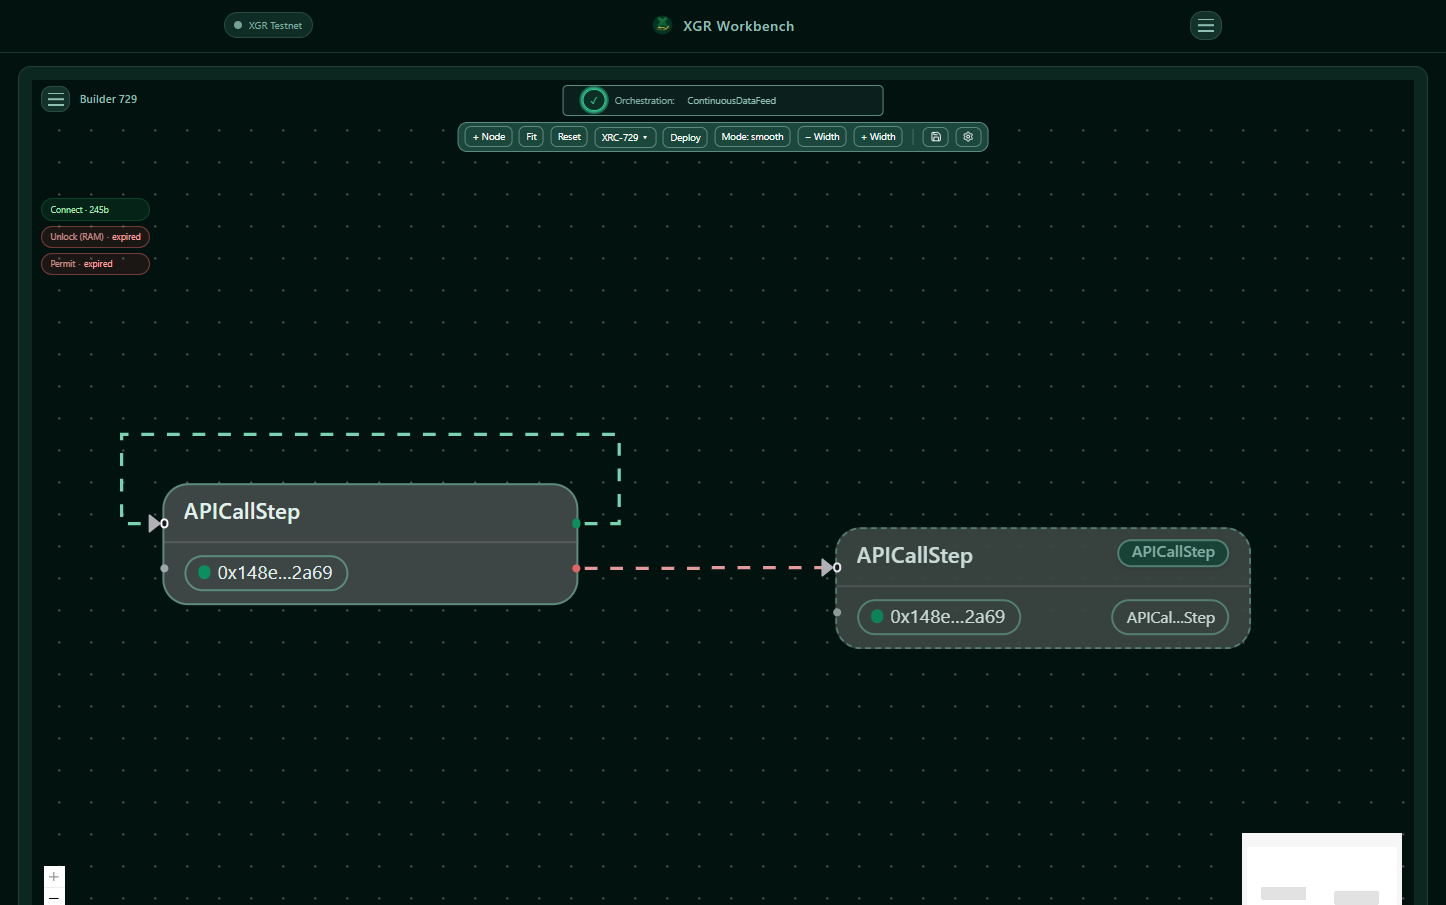 — The Builder 729 canvas showing workflow nodes connected by spawn edges, with the toolbar at the top.
Key Areas
| Area | Description |
|---|---|
| Canvas | The main workspace where you arrange and connect nodes |
| Toolbar | Top bar with node actions, XRC-729 menu, deploy button, and view controls |
| Node Menu | Panel for editing the selected node's stepId and rule |
| Connect Menu | Popup for creating spawn or join connections between nodes |
3) The Toolbar
The toolbar provides quick access to all major functions.
What you see
 — Toolbar showing: + Node, Fit, Reset, XRC-729 menu, Deploy button, Mode toggle, Width controls, Save and Settings icons.
Toolbar Buttons
| Button | Action |
|---|---|
| + Node | Add a new step node to the canvas |
| Fit | Zoom and pan to fit all nodes in view |
| Reset | Clear the canvas and start fresh |
| XRC-729 ▾ | Open the XRC-729 operations menu |
| Deploy | Open the deployment dialog (disabled if validation fails) |
| Mode | Toggle between editing modes |
| − Width / + Width | Adjust node width on canvas |
| Save icon | Save current orchestration to Contract Manager |
| Settings icon | Open Contract Manager |
XRC-729 Menu
Click XRC-729 ▾ to access:
What you see
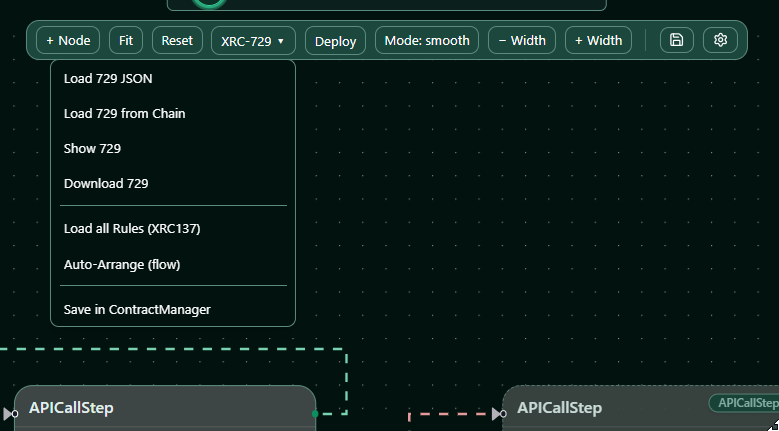 — Dropdown menu with Load/Save/Export options.
| Option | Description |
|---|---|
| Load 729 JSON | Import an orchestration from a local JSON file |
| Load 729 from Chain | Fetch an existing orchestration from a deployed contract |
| Show 729 | Display the current orchestration JSON |
| Download 729 | Export the orchestration as a JSON file |
| Load all Rules (XRC137) | Import all referenced XRC-137 rules |
| Auto-Arrange (flow) | Automatically reposition nodes in a clean flow layout |
| Save in ContractManager | Store the orchestration in your local Contract Manager |
4) Working with Nodes
Adding a Node
- Click + Node in the toolbar
- A new node appears on the canvas with a default ID (e.g., "N1", "N2", ...)
- Drag the node to position it
Selecting a Node
Click on any node to select it. The selected node:
- Shows a highlighted border
- Opens the Node Menu for editing
The Node Menu
What you see
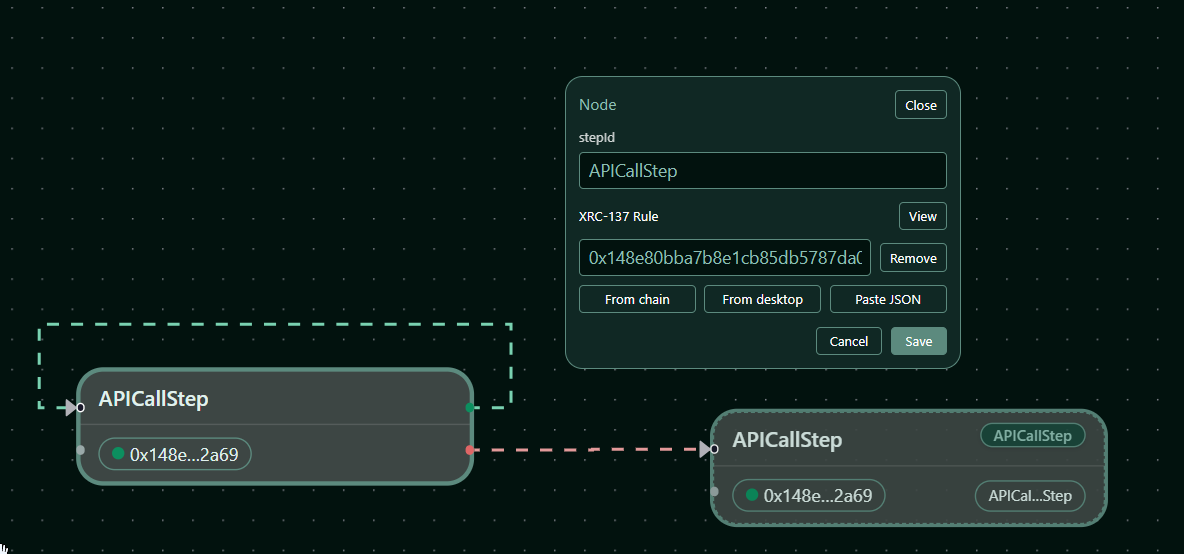 — Node Menu panel showing stepId input, XRC-137 Rule section with load options, and Save/Cancel buttons.
stepId
The unique identifier for this step in the orchestration.
Naming Rules:
- Must start with a letter (A-Z, a-z)
- Can contain letters, digits, and underscores
- Maximum 128 characters
- Pattern: [A-Za-z][A-Za-z0-9_]{0,127}
- Cannot start or end with underscore
If the name is invalid, the input shows a red border and the Save button is disabled.
What you see
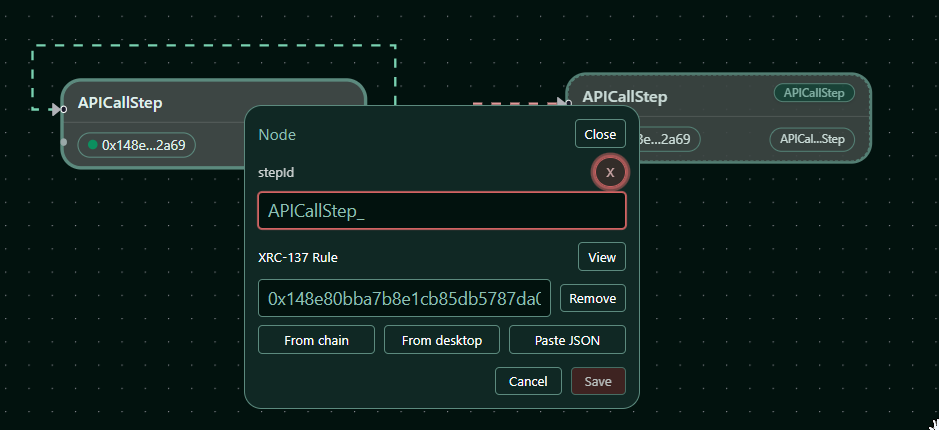 — Invalid step name showing red border and error indicator.
XRC-137 Rule
Each step can reference an XRC-137 rule contract. You can load a rule via:
| Button | Description |
|---|---|
| From chain | Load rule JSON from a deployed contract address (requires valid 0x address in input) |
| From desktop | Upload a rule JSON file from your computer |
| Paste JSON | Paste rule JSON directly |
Once a rule is assigned:
- The View button appears to inspect the rule interface JSON
- The Remove button clears the rule assignment
Saving Changes
- Cancel — Discard changes and close the menu
- Save — Commit changes to the node (only active when changes exist and name is valid)
5) Connecting Nodes — Spawn and Join
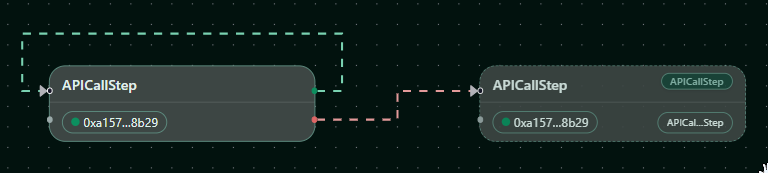
Understanding Spawn
Spawn creates a parent-child relationship between steps. When a step completes (valid or invalid), it can spawn one or more child steps.
What you see
 — Two nodes connected by a spawn edge, showing the parent spawning the child on the valid outcome.
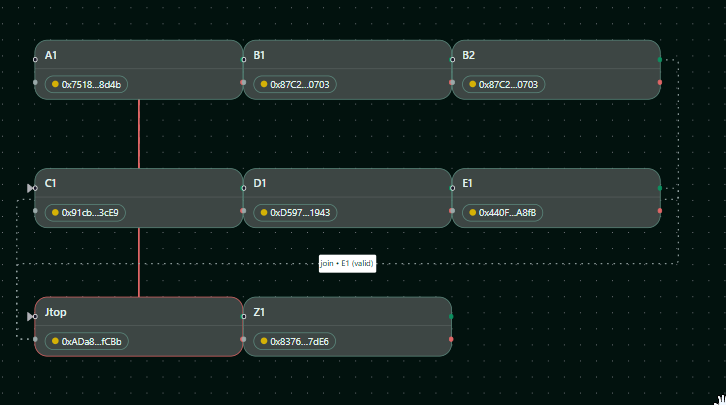
Understanding Join
Join merges multiple execution paths back into a single step. A step with a join waits for specified source nodes to complete before executing.
What you see
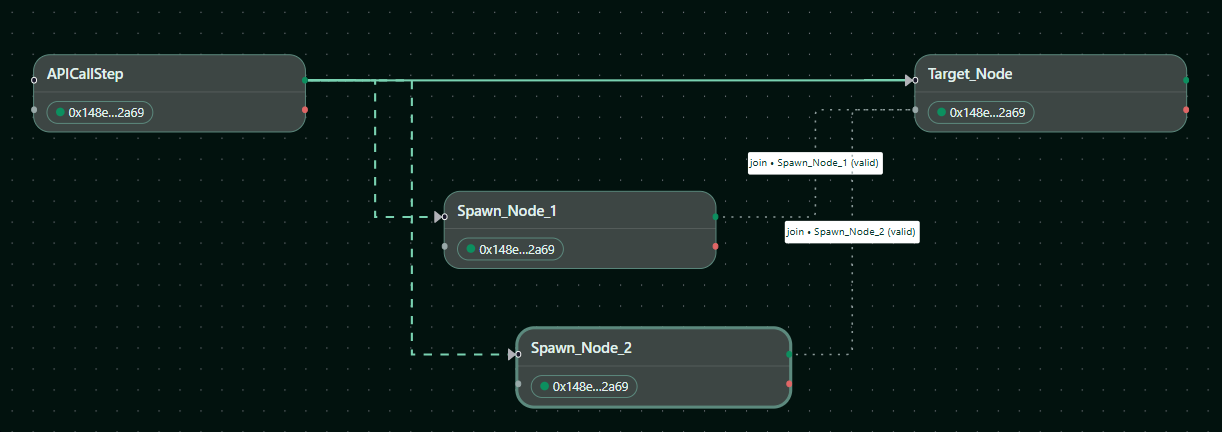 — Three nodes where two parallel paths join into a single target node.
The Connect Menu
To create connections between nodes, use the Connect Menu:
What you see
 — Connect Menu showing spawn and join configuration options.
Creating a Spawn
- Drag a line from the source node's output handle to the target node
- A dashed spawn edge is created automatically
- The spawn is added to the source node's
onValidoronInvalidbranch (depending on which handle you dragged from)
What you see
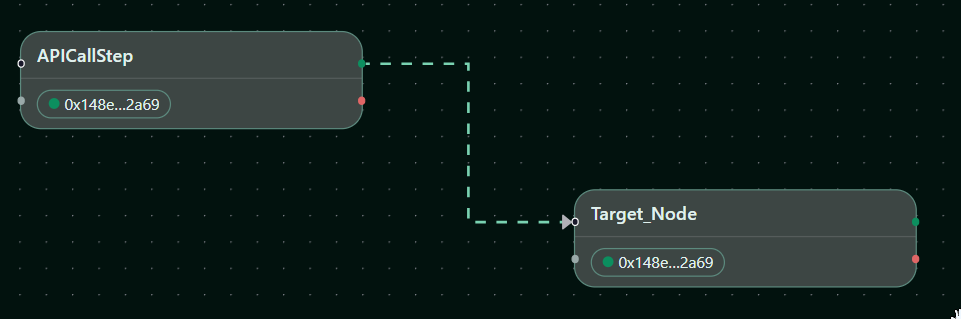 — A dashed line indicating a spawn connection between two nodes.
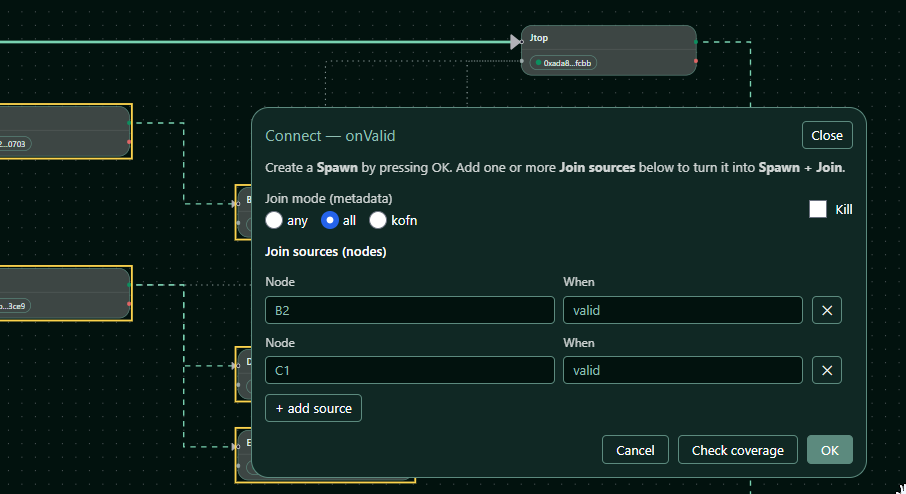
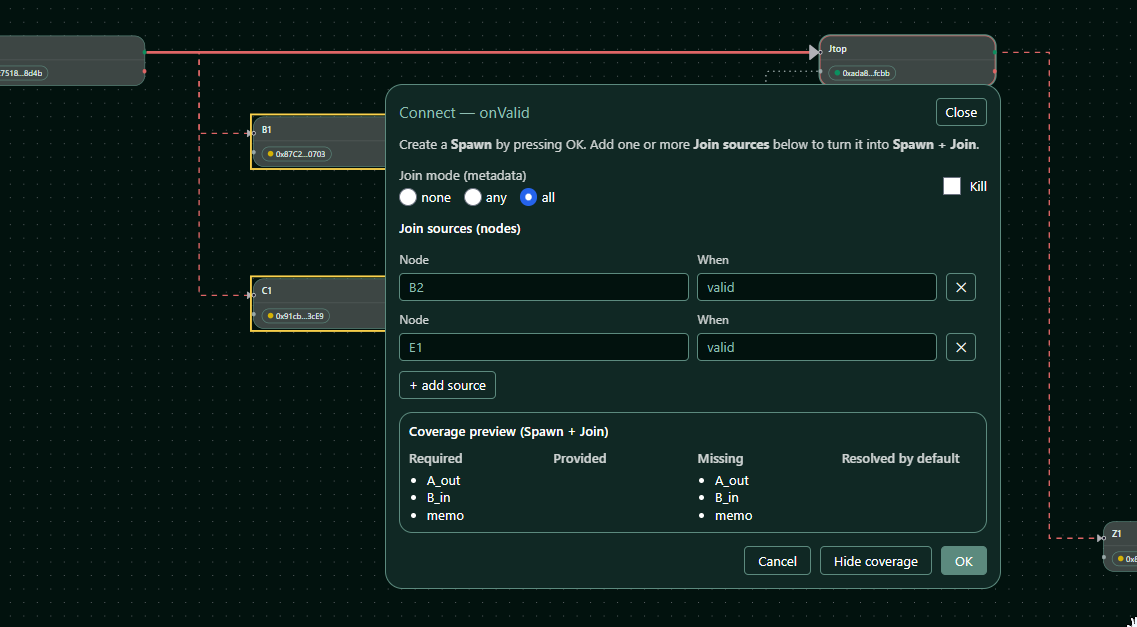
Converting a Spawn to Spawn + Join
To add join logic to an existing spawn connection:
- Double-click on the dashed spawn edge
- The Connect Menu opens
What you see
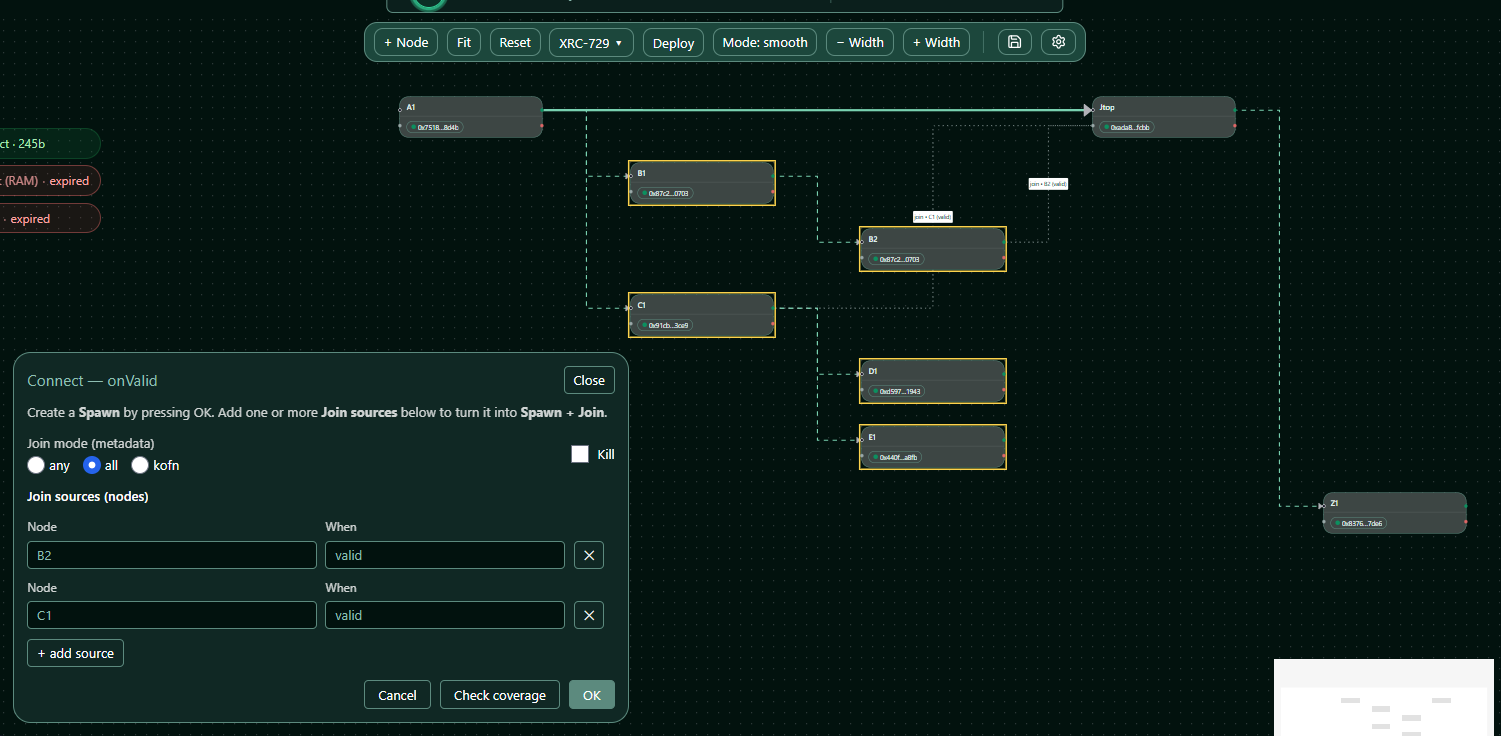 — Connect Menu showing spawn configuration with join source options. Eligible join nodes are highlighted with a yellow border on the canvas.
- Click + add source to add join sources
- Select which nodes must complete before the target executes
- Configure the join mode and options
- Click OK to confirm
Connect Menu Options
| Field | Description |
|---|---|
| Join mode (metadata) | any (default — first source triggers), all (wait for all sources), or k-of-n (stored as an object like {"kofn": 2}) |
| k | Number input — only visible when join mode is k-of-n. Stored in the JSON inside mode as {"kofn": <k>}. Must be ≥ 1 and ≤ number of join sources. |
| Kill | Checkbox — terminate other branches when join triggers (waitonjoin: "kill") |
| Join sources (nodes) | List of source nodes that feed into this join |
Join Source Entry
Each join source specifies:
| Field | Description |
|---|---|
| Node | The source step ID (eligible nodes are highlighted yellow on canvas) |
| When | both (default — either outcome), valid, or invalid — which outcome qualifies as "completed" for this source |
| × | Remove this source from the join |
JSON Behavior
mode: "any"is the default and omitted from the JSON output (implicit)mode: "all"is explicitly stored when selected- k-of-n is stored as an object inside
mode(e.g.,"mode": { "kofn": 2 }). There is no separatekfield. when: "both"is the default for join sources and omitted from the JSON output
6) Mirror Nodes
When a node is the target of multiple spawn edges, the builder creates mirror nodes for visual clarity. Mirrors are read-only duplicates that show where execution flows.
What you see
 — A node with its mirror showing the same step referenced from multiple parents.
Mirror rules: - Mirrors appear with a special indicator - Mirrors cannot be directly edited (edit the original node) - Mirrors have no outgoing edges
7) Auto-Arrange
For complex orchestrations, use Auto-Arrange to automatically position nodes in a clean flow layout.
- Open the XRC-729 menu
- Click Auto-Arrange (flow)
- Nodes are repositioned based on their spawn relationships
What you see
 — Before: nodes in their original positions.
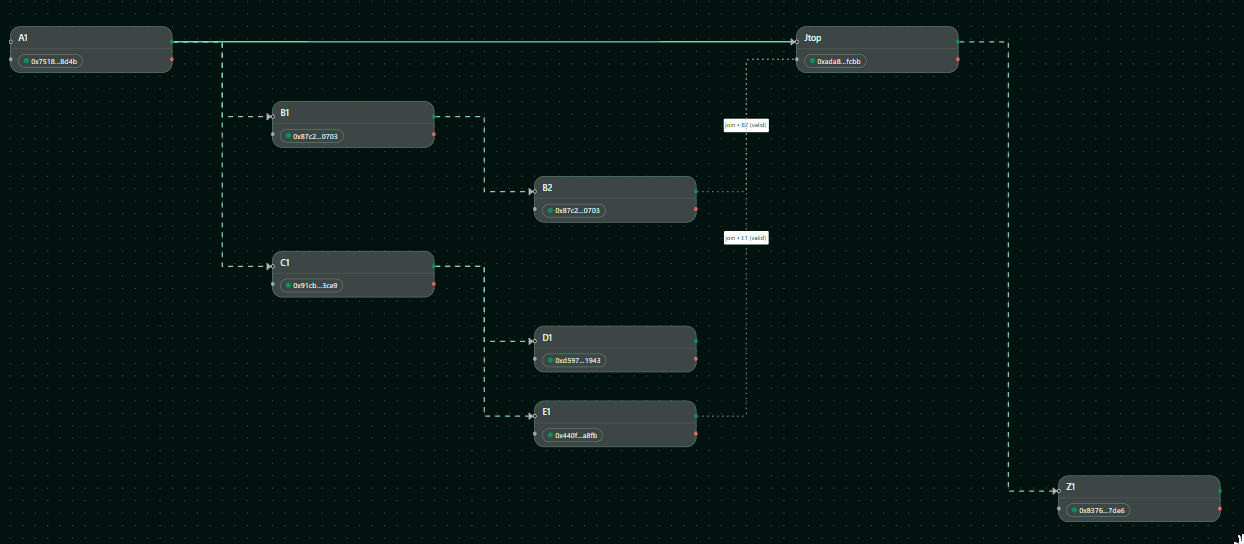 — After: nodes reorganized into a readable flow.
8) Validation
The builder validates your orchestration in real-time:
Validation checks include: - All step names follow naming rules - Referenced rules exist or have valid addresses - Join configurations reference valid source nodes - Reachability: join sources must be reachable from the spawn source - Payload field coverage check (mode-dependent)
Validation Modes:
- Smooth mode allows invalid connections during development. This is helpful when building and iterating on an orchestration where some rule contracts are not yet deployed or haven't been updated to new requirements.
- Strict mode removes invalid connections to ensure the orchestration is fully consistent. Before deployment, switch to Strict mode — it will cut all connections that fail the coverage check in the Connect menu (e.g., connections with missing required fields).
What you see
 — Validation error indicator showing issues that must be fixed before deployment.
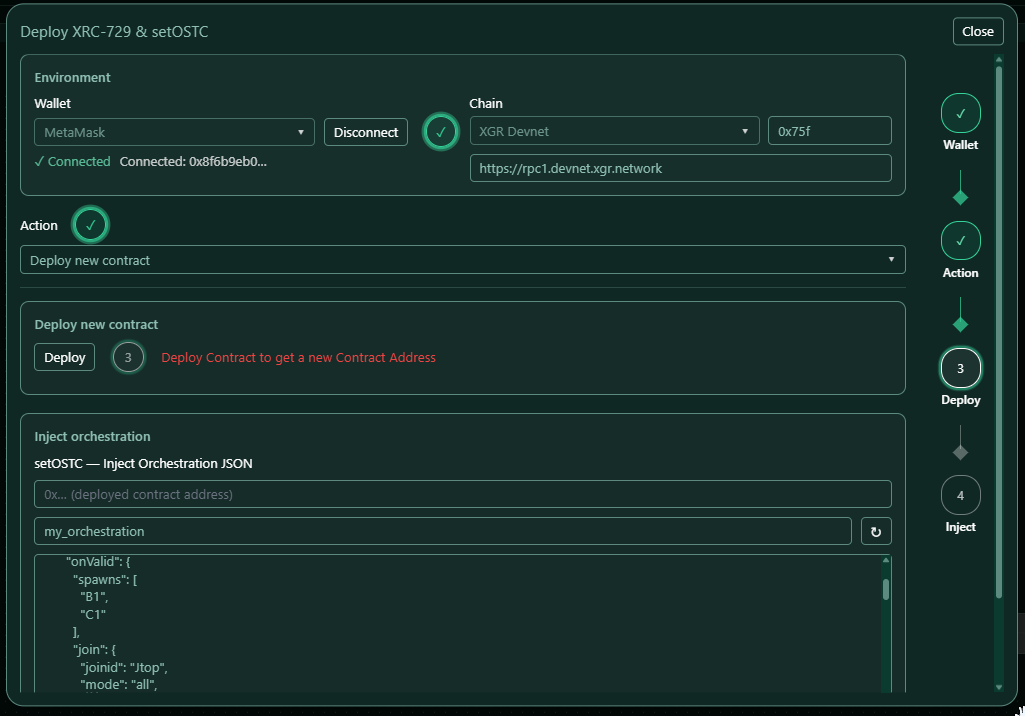
9) Deployment
Opening the Deploy Dialog
Click the Deploy button in the toolbar (only active when validation passes).
What you see
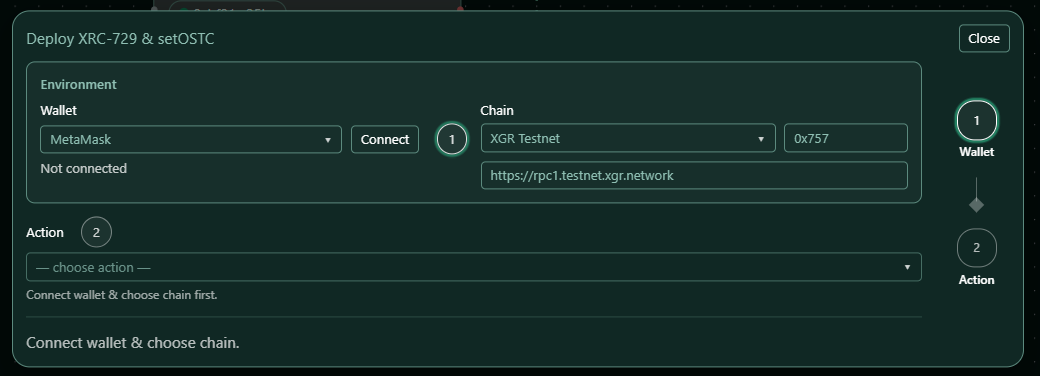 — Deploy dialog showing wallet connection status, chain selection, and deployment options.
Deployment Steps
- Connect Wallet — Connect your browser wallet (e.g., MetaMask)
- Select Chain — Choose the target blockchain network (Testnet / Mainnet)
- Review — Verify the orchestration JSON
- Select Deploy Action — Deploy new contract or add/change/delete orchestration in an existing contract
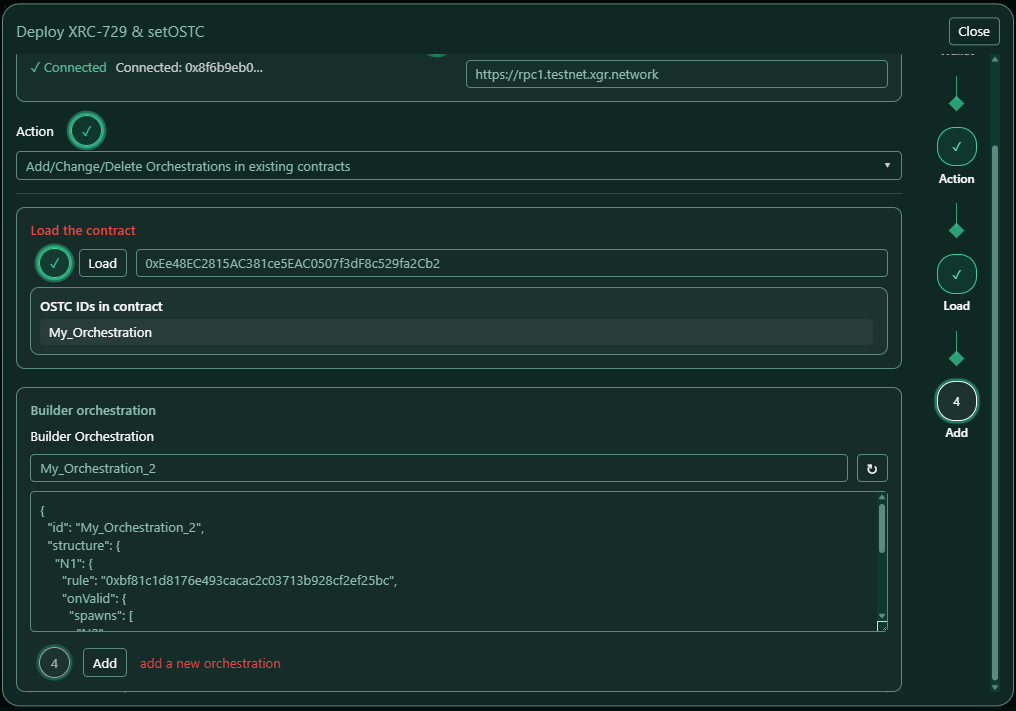
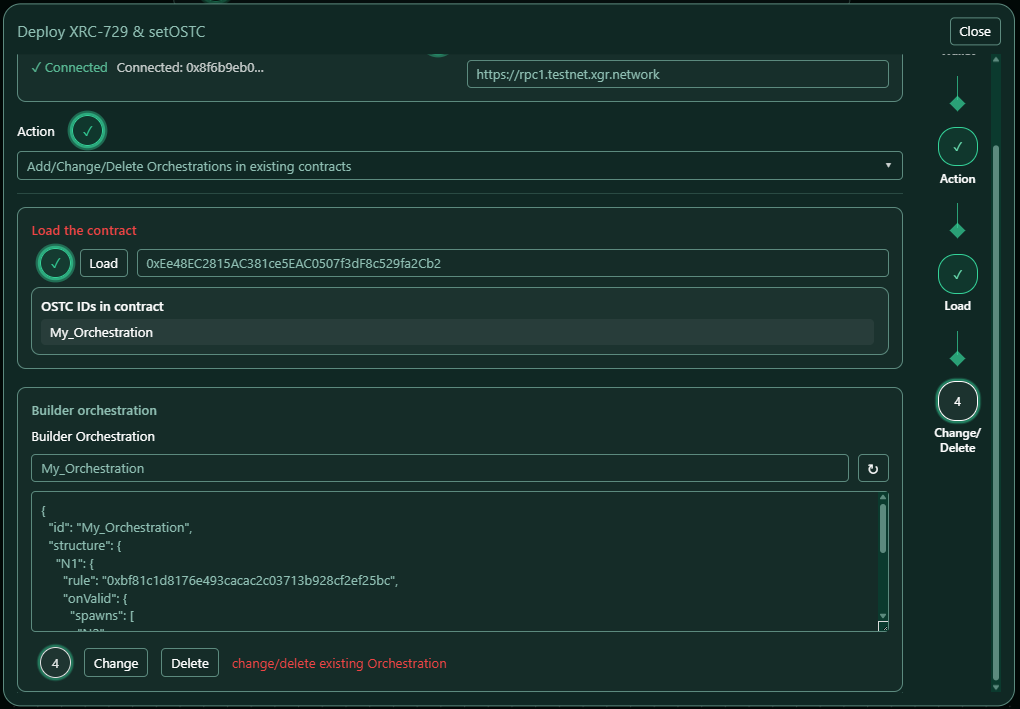
 — Deploy dialog showing deployment options.
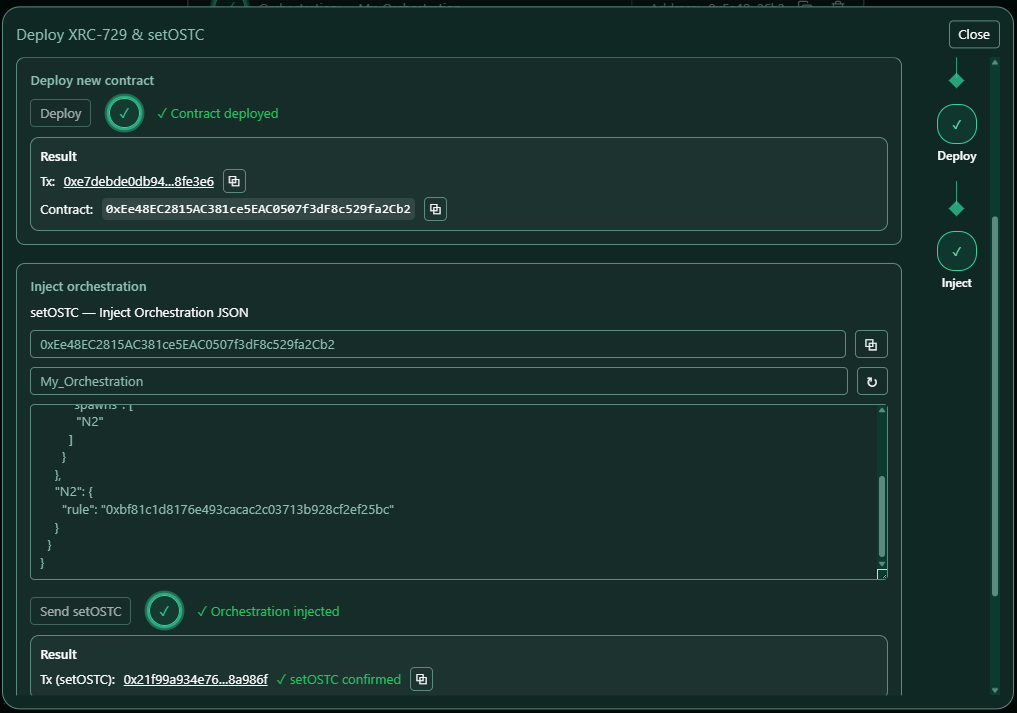
Deploy new contract - Press Deploy to create a new XRC-729 contract address via transaction - To inject the new orchestration, press Send SetOSTC via a separate transaction - You can check the result of each transaction in the result box
Add, Change, or Delete Orchestration in existing Contracts - Press Load — enter an existing XRC-729 contract address in the input field next to the Load button and press Load
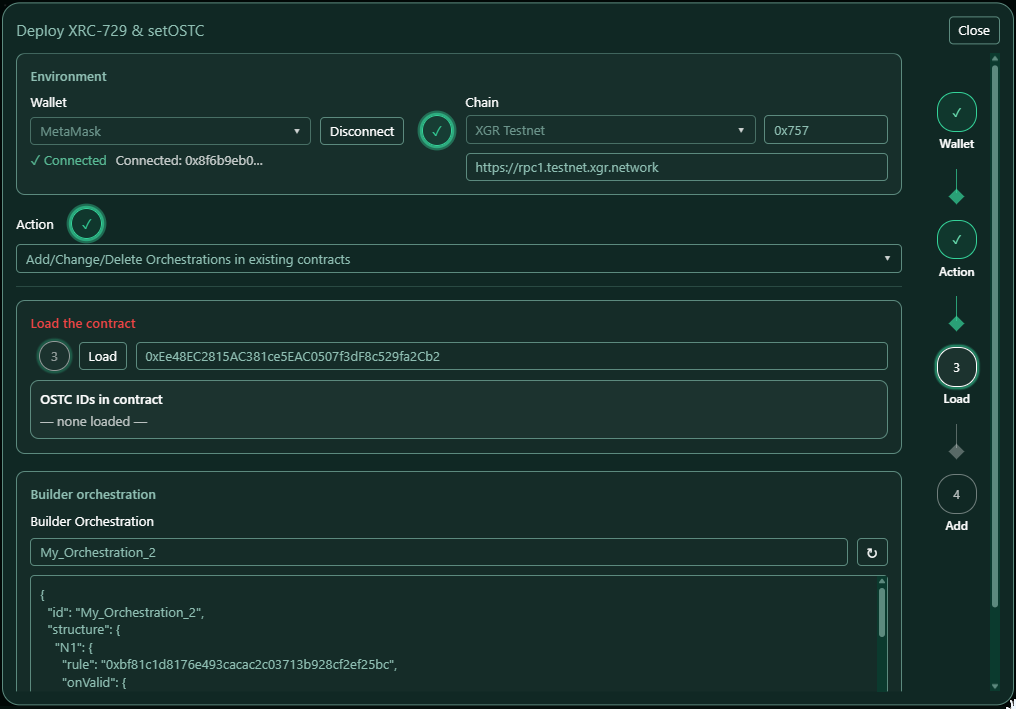
- After loading a contract, there are three choices:
- Add — when your orchestration ID does not exist in the contract, press Add to add the orchestration
- Change — when your orchestration ID already exists in the contract, press Change to update the orchestration
- Delete — when your orchestration ID exists in the contract and you want to remove it, press Delete to delete the orchestration
- You can check the result of each transaction in the result box
After Deployment
Once deployed: - The contract address is displayed - You can copy the address or view it in the block explorer - The address can be passed back to update the builder state
10) Saving and Loading
Save to Contract Manager
- Click the Save icon in the toolbar, or
- Open XRC-729 menu → Save in ContractManager
The orchestration is stored locally for later use.
Load from Contract Manager
- Click the Settings icon to open Contract Manager
- Select a saved orchestration
- Click Load
Load from Chain
- Open XRC-729 menu → Load 729 from Chain
- Enter the deployed contract address
- The orchestration is fetched and displayed on canvas
Export/Import JSON
- Download 729 — Exports the orchestration as a
.jsonfile - Load 729 JSON — Imports from a local
.jsonfile
11) Orchestration JSON Structure
The orchestration JSON follows this structure:
{
  "id": "my_orchestration",
  "structure": {
    "A1": {
      "rule": "0x7518afb19381d2b54a9e2dba2f8c35921d588d4b",
      "onValid": {
        "spawns": [
          "B1",
          "C1"
        ],
        "join": {
          "joinid": "Jtop",
          "mode": "all",
          "from": [
            {
              "node": "B2",
              "when": "valid"
            },
            {
              "node": "E1",
              "when": "valid"
            }
          ]
        }
      }
    },
    "B1": {
      "rule": "0x87c2b9848ac768b6230bca1aa50fda60362d0703",
      "onValid": {
        "spawns": [
          "B2"
        ]
      }
    },
    "B2": {
      "rule": "0x87c2b9848ac768b6230bca1aa50fda60362d0703"
    },
    "C1": {
      "rule": "0x91cbf1879b890393121058607f2953c728d03ce9",
      "onValid": {
        "spawns": [
          "D1",
          "E1"
        ]
      }
    },
    "D1": {
      "rule": "0xd597473b3674d94f28e3baa6a47a0aafc7a91943"
    },
    "E1": {
      "rule": "0x440f756d0abe1850be03941e83de9a2b01c9a8fb"
    },
    "Jtop": {
      "rule": "0xada8032804716d1f4f9c04e6e0e4b1902bd4fcbb",
      "onValid": {
        "spawns": [
          "Z1"
        ]
      }
    },
    "Z1": {
      "rule": "0x83767f265d01bf20893ec77ce8170bb052917de6"
    }
  }
}
Structure Fields
| Field | Description |
|---|---|
| id | Orchestration name (follows naming rules) |
| structure | Object containing all steps keyed by stepId |
| rule | XRC-137 contract address for this step |
| onValid | Actions when the rule evaluates to true |
| onInvalid | Actions when the rule evaluates to false |
| spawns | Array of step IDs to spawn |
| join | Join configuration object |
| join.joinid | Target step ID to continue to |
| join.from | Array of source nodes with node and optional when |
| join.mode | any (default, omitted), all, or an object for k-of-n (e.g., { "kofn": 2 }) |
| join.waitonjoin | Optional: "kill" to terminate other branches |
12) Best Practices
Naming
- Use descriptive step names (e.g., "ValidateUser", "CheckBalance")
- Avoid generic names like "N1", "N2" in production
- Keep names under 128 characters
Flow Design
- Start with a clear entry point
- Use spawns for parallel execution
- Use joins to synchronize parallel paths
- Keep the flow readable — use Auto-Arrange
Testing
- Always test on Testnet first
- Verify all XRC-137 rules are deployed and accessible
- Check executor permissions using OPS → Manage Execution
- Use Strict mode before deployment
Deployment
- Ensure your wallet is connected to the correct network
- Have sufficient gas for deployment
- Save the deployed address in Contract Manager
13) Troubleshooting
Deploy button is disabled
- Check validation errors
- Ensure orchestration name follows naming rules
- Verify all step names are valid
Cannot create join
- Verify source nodes exist in the current flow
- Check that target node is reachable from the sources (click on join connection — yellow-marked nodes are reachable)
- Ensure the join configuration is complete
Mirror nodes appear unexpectedly
- This is normal when a node has multiple incoming spawn edges
- Edit the original node, not the mirror
Auto-Arrange produces unexpected layout
- Complex orchestrations with many joins may require manual adjustment
- Try simplifying the flow structure
Cannot load from chain
- Verify the contract address is correct
- Ensure you're connected to the right network
- Check that the contract is an XRC-729
14) Keyboard Shortcuts
| Shortcut | Action |
|---|---|
| Delete / Backspace | Remove selected node or edge |
| Ctrl+Z / Cmd+Z | Undo last action |
| Ctrl+Shift+Z / Cmd+Shift+Z | Redo |
| Ctrl+A / Cmd+A | Select all nodes |
| Escape | Deselect / Close menu |
15) Related Guides
- Wallet Connect →
XGR-Wallet-Connect-Guide.md - Deploy →
XGR-Deploy-Guide.md - Rule Executor Coverage →
XGR-OPS-Rule-Executor-Coverage.md - XRC-137 Rules →
XGR-Builder137-Overview.md - Encryption & Grants → https://xgr.network/docs.html#xrc563
Last updated: 2026-01-19