XGR OPS — List Sessions
This guide explains how to use OPS → List Sessions to find, inspect, wake up, export, and visualize execution sessions.
1) What you can do here
With List Sessions you can:
- Connect a wallet and select a chain (RPC).
- List your sessions (My Sessions) or run wakeups via allowlist (Allowlist WakeUp).
- Filter and sort sessions/steps.
- Open a detailed timeline for a session or a single step.
- Wake up WAITING steps (with optional payload).
- Export logs (JSON or fast NDJSON stream).
- Jump into the Flow View to visualize the session topology.
What you see
 — The List Sessions page with wallet connect, list mode, and the sessions table.
2) Key terms (quick)
- SessionID: The top-level execution identifier.
- PID (ProcessID): A process instance inside the session (can have a parent PID).
- Iteration: A numeric counter for repeated runs within the same session.
- Step: The workflow step identifier (often long; click to view full name).
- Status:
- WAITING: needs a wakeup to continue or automatically resumes when the configured wait time has elapsed
- DONE: finished successfully
- ABORTED / ERROR: stopped with error
- RUNNING: currently executing or in-progress
3) Step-by-step: list sessions
3.1 Connect wallet + chain (Step 1)
- Select the Chain (RPC environment).
- Select your Wallet.
- Click Connect.
What you see
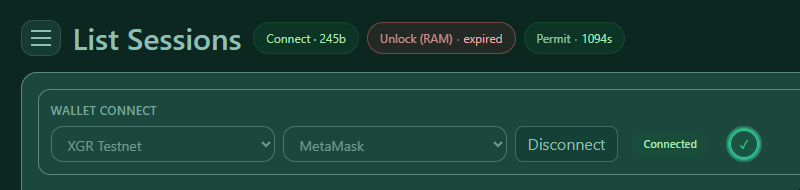 — Chain + wallet selection with the connect button and connection status.
3.2 Choose list mode (Step 2)
You have two modes:
A) My Sessions (owner mode)
Use this when you want to manage your own sessions (created/owned by your wallet).
You can: - list sessions - open details - wake up waiting steps - export logs - kill a session (owner-only)
B) Allowlist WakeUp (runner mode)
Use this when you are allowed to wake up a session owned by someone else.
You typically need: - SessionID - Runner = the owner address of that session
You can: - load waiting steps for that session - wake them up (if allowlisted) - export logs / inspect details
What you see
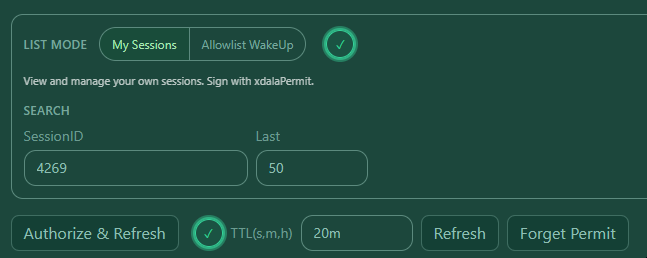 — Switching between “My Sessions” and “Allowlist WakeUp” with mode-specific inputs.
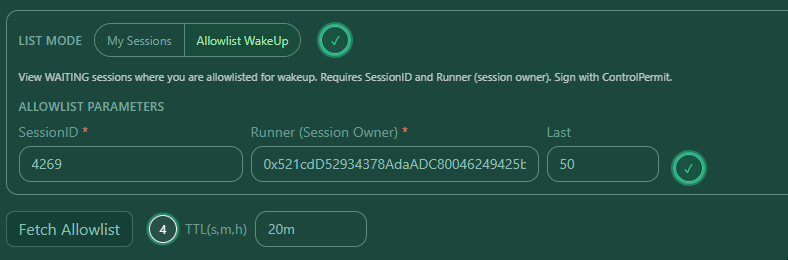 — Switching between “My Sessions” and “Allowlist WakeUp” with mode-specific inputs.
3.3 Authorize and refresh (Step 3)
Operations are protected by short-lived authorization (“permit”) so you don’t have to sign every single click.
- TTL controls how long your authorization is valid (e.g. 5m, 1h, 1d).
- Authorize & Refresh: signs once and then loads the list.
- Refresh: reloads using your existing authorization.
- Forget Permit: clears the cached authorization (you will need to authorize again).
What you see
 — Action buttons with TTL selection and permit status.
4) Working with the sessions table
4.1 Sorting
- Click a column header to sort.
- Shift + click adds a secondary sort (multi-sort).
4.2 Filtering
Use the filter row to narrow down results:
- SessionID / PID / Iteration: numeric filters (single value, ranges, lists)
- Step / Owner: text “contains” search
- Status: one or multiple statuses
- Updated: time range
Example filters:
- SessionID: 1200-1400
- PID: 100,101,102
- Status: waiting,running
What you see
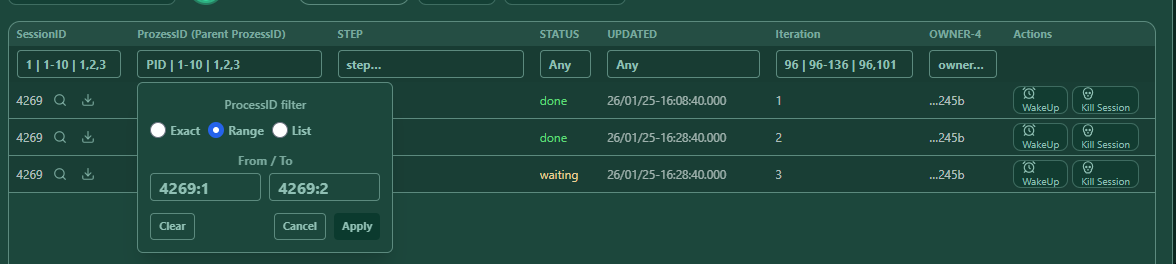 — Filters and multi-sort on the sessions table.
5) Row actions (what each button does)
Depending on the row and mode, you’ll see actions like:
5.1 Flow View (visualize)
- Click SessionID or PID link to open the Flow View for the session or subtree.
5.2 Details (timeline)
- “Details” shows a readable timeline and decoded information for:
- the full session, or
- a single step (iteration)
5.3 Wake Up (WAITING only)
- Enabled when a step is WAITING.
- Opens the WakeUp dialog (see Section 6).
5.4 Kill Session (owner-only)
- Stops a session. Use carefully (production operators usually keep this restricted).
5.5 Export Logs
- Export logs for the whole session or a single step (see Section 7).
What you see
 — Row actions: flow link, details, wakeup, log export (and kill in owner mode).
6) WakeUp (continue WAITING steps)
The WakeUp dialog is used to continue a session that is waiting.
6.1 Choose what to wake
You can wake up in two ways:
- By PID: wake a specific waiting process instance.
- By StepId: wake by step (when many processes are waiting on the same step).
What you see
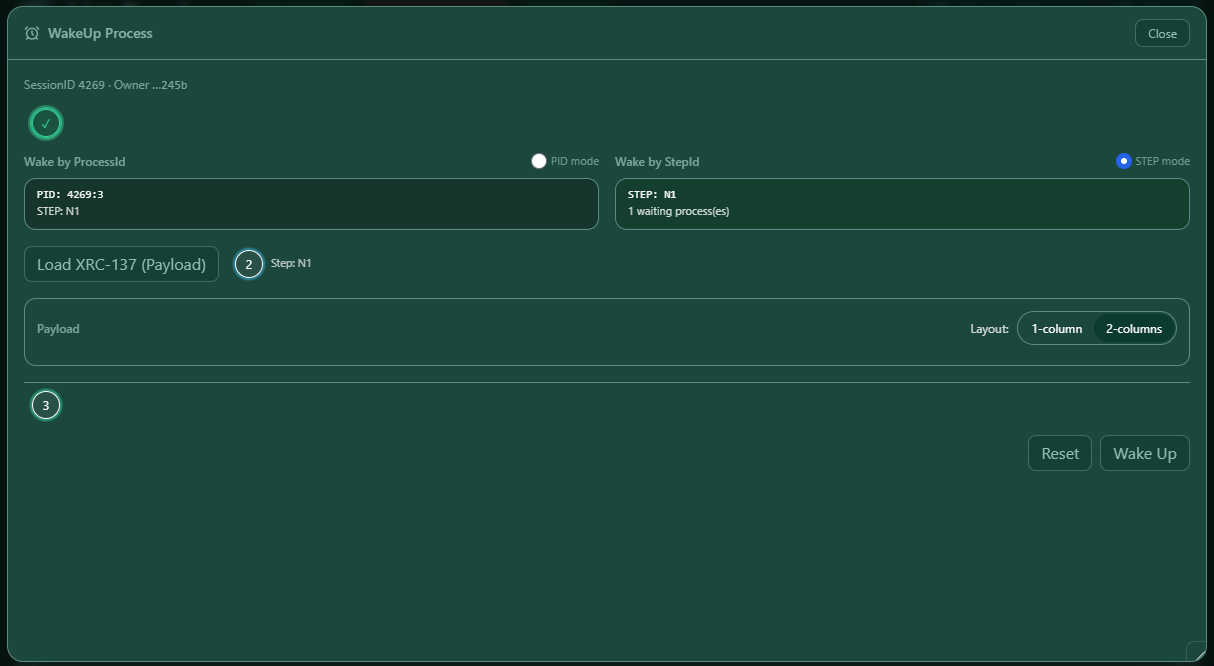 — WakeUp dialog with PID list, Step list, and selection mode.
6.2 Optional: add a payload
Some steps require a payload to continue (e.g. approvals, external inputs).
You can: - Fill the payload fields (if available). - Switch layout (1-column / 2-columns) for better readability. - Optionally load a payload schema from chain (advanced Load XRC-137 Rule Contract).
If you don’t need a payload, you can wake up with an empty payload.
What you see
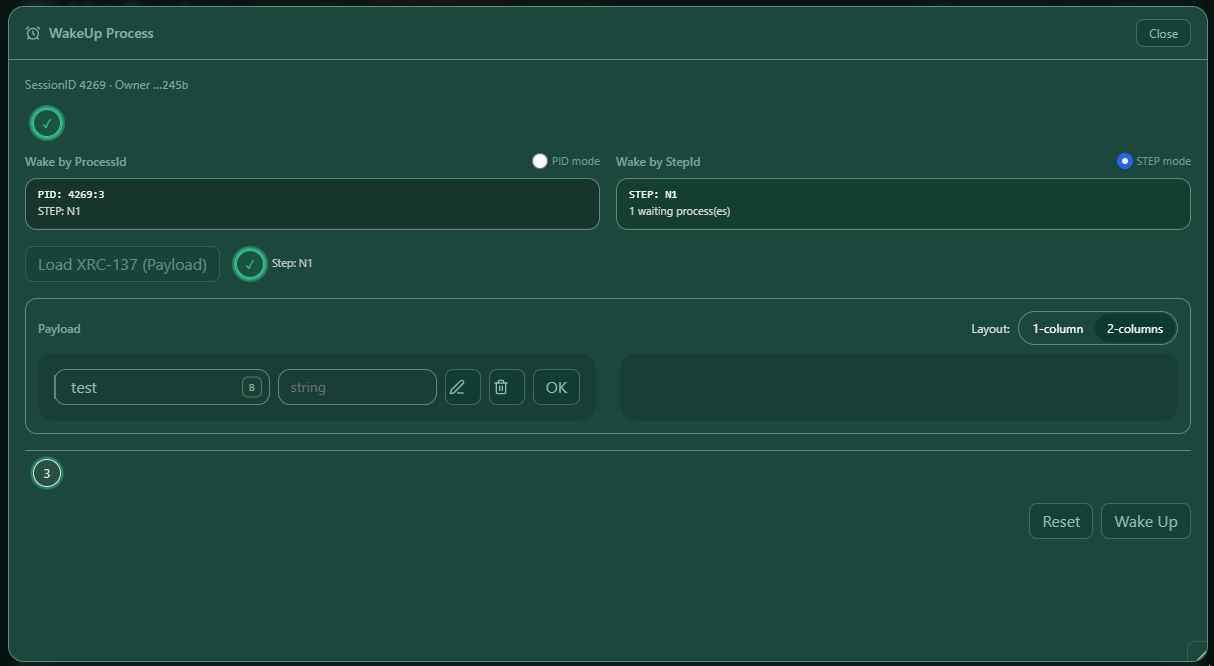 — Payload editor in the WakeUp dialog (optional, schema-driven fields).
6.3 Execute wakeup
Click Wake Up to send the wakeup signal.
After the call, you’ll see a result screen where you can: - Copy the result JSON - Download the result JSON (useful for audit trails)
What you see
 — WakeUp result screen with success/error and copy/download actions.
6.4 Allowlist mode: after success
In Allowlist WakeUp mode, after a successful wakeup, closing the dialog can reset the allowlist list so you can start a fresh run for another session.
7) Export logs (session / single step)
Use Export Logs to create an audit-friendly data export.
7.1 Two export types
A) Local Download (JSON)
- Creates a
.jsonfile in your browser. - Best for small/medium exports.
- Uses the currently loaded/previewed dataset.
B) Fast Stream (NDJSON)
- Creates a
.ndjsonfile (one JSON object per line). - Best for very large exports.
- Streams directly and is more memory-efficient.
What you see
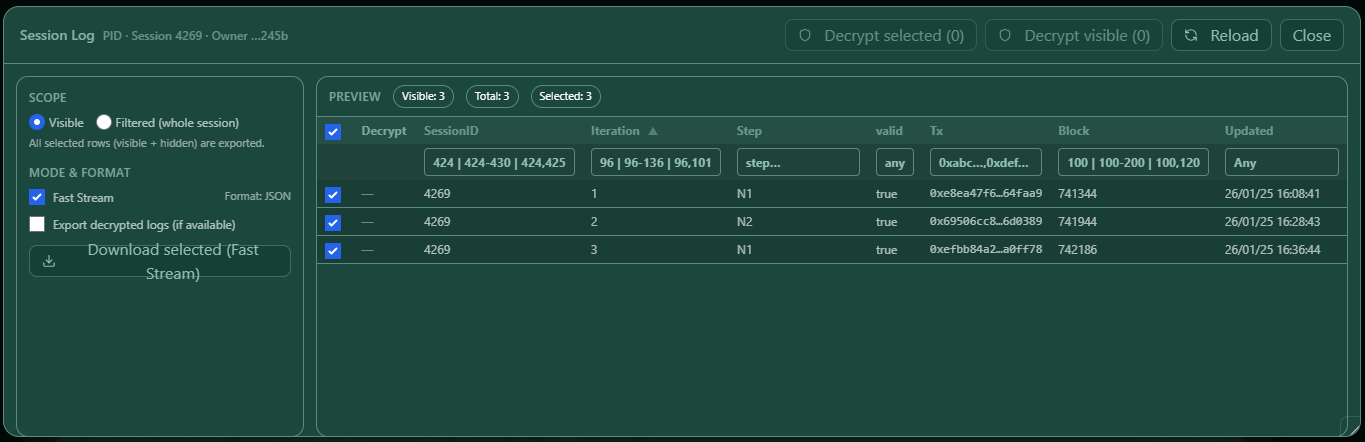 — Log export dialog with preview, filters, and export options.
7.2 Preview, filters & selection
In the export dialog you can:
- Filter down by PID / Iteration / Step / Valid / TxHash etc.
- Choose export scope:
- export the visible selection, or
- export the filtered result set
7.3 Optional: include decrypted payloads
If your logs are encrypted, you may see a toggle like: - Include decrypted payloads
This may require an additional unlock/authorization step (depending on your setup). If your logs are stored in encrypted form, you can decrypt them for the download.
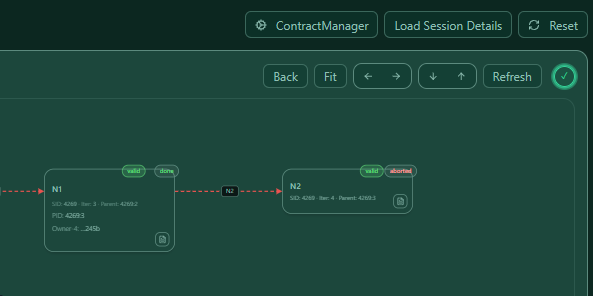
8) Flow View (visualize a session)
The Flow View helps you understand the topology of a session:
- Each node represents a process execution entry.
- Edges represent parent/child relationships.
- You can open details for a node/step directly from the graph.
8.1 Navigation
From List Sessions: - click a SessionID to view the full session flow - click a PID to view a subtree
8.2 Pan, zoom, fit
- Drag background to pan
- Mouse wheel / trackpad to zoom
- Use “Fit” (if available) to bring everything into view
What you see
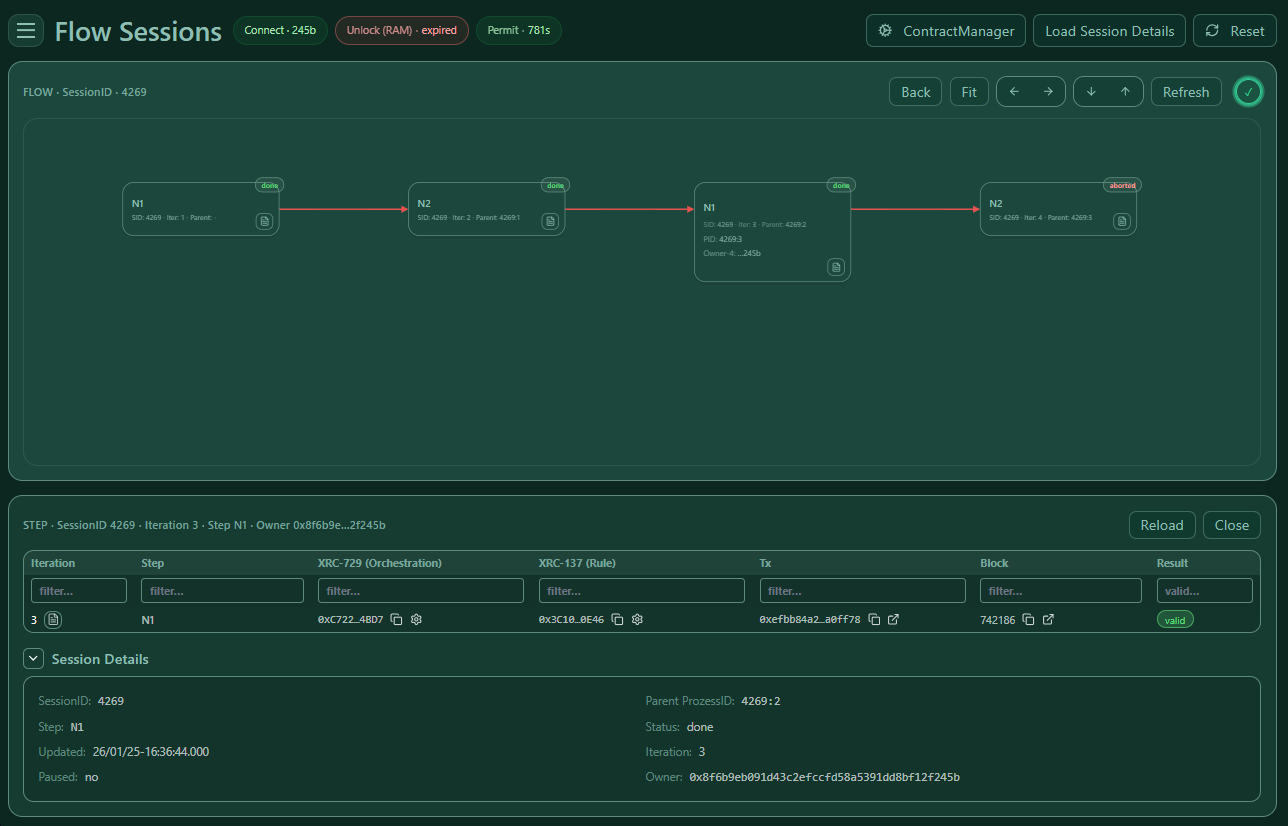 — Flow View with node cards, status pills, and zoom/pan.
8.3 Open details from a node
Nodes include a small “document” icon. Clicking it opens the detailed timeline for that step/process.
What you see
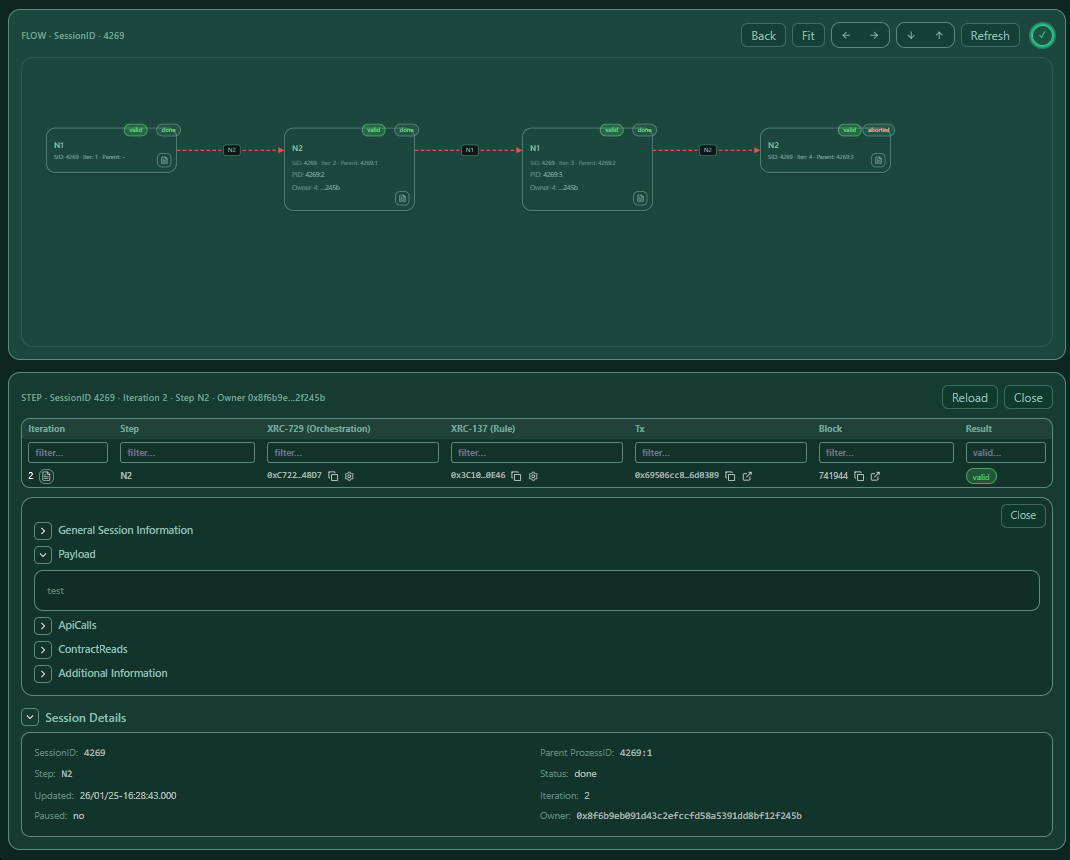 — Opening the step receipt/timeline from a node inside the flow view.
8.4 Load Session Details (optional enhancement)
If available, you can load additional session details that enrich the nodes (e.g. valid/invalid info and join hints).
What you see
 — Loading session details to enrich the graph.
9) Troubleshooting
“Authorize & Refresh” works, but list is empty
- Check you are on the correct chain (RPC environment).
- Increase Last (how many rows to fetch).
“Permit expired” / actions suddenly fail
- Your TTL ran out. Click Authorize & Refresh again.
Allowlist WakeUp shows nothing
- Double-check:
- SessionID is correct
- Runner is the session owner address
- your wallet is actually allowlisted
WakeUp fails
- Confirm the step is really WAITING.
- If a payload is required, ensure it matches what the step expects.
- Try exporting logs for that step and check the last engine message.
Exports are too large / slow
- Prefer Fast Stream (NDJSON) for large exports.
- Filter by Iteration/Step first to reduce volume.
10) Notes for teams (multi-user)
- This page is designed for multi-user operations: different operators can work on different sessions at the same time.
- In shared environments, use short TTLs (e.g. 5–20 minutes) and “Forget Permit” when you’re done.
- For mobile ops, prefer:
- 1-column payload layout
- smaller “Last” values + filters before exporting