XGR Test Suite
The XGR Test Suite is the workspace for building, validating, deploying, running and reviewing reproducible XGR test cases. It connects bundle import, test plan editing, signer alias preparation, setup contracts, multi-session scenarios, BundleDeploy handoff, Start Sessions execution and result analysis in one guided flow.
Use this guide to understand the full workflow from an imported XRC-137 / XRC-729 bundle to a runnable test plan. It explains how to configure runtime payloads, owner and executor aliases, setup contracts, expected timeline checks, API save checks, contract read checks and scenario wake-up flows so a user can create reliable tests without knowing the internal implementation.
A few terms are used throughout this guide:
| Term | Meaning in the Test Suite |
|---|---|
| Bundle | Imported XRC-137 / XRC-729 deployment data. A bundle can be reviewed, deployed, or converted into a local test plan. |
| Test plan | A runnable test definition. It contains start settings, payload data, aliases, setup contracts and expectations. |
| Scenario | A coordinated flow that can start and observe several test plans/sessions, for example a KYC worker session and an order process session. |
| Result bundle | Exported run output. Analyze uses one result bundle; Compare uses two result bundles. |
| Assertion / check | A condition the Test Suite verifies. If the expected and actual values match, the check passes. If not, the result is failed or pending, depending on the data available. |
| Timeline check | A check for a specific step occurrence during execution. It can verify whether the step exists, whether it is valid, which status it reached, and optional payload/API/contract-read values. |
| Wakeup allowlist | Runtime configuration that defines who may wake a waiting process step. It can allow internal process wakeups, external RPC wakeups, or both. |
| Internal wakeup | A wakeup triggered by another XRC process/contract. It can restrict the allowed caller address and the allowed source XRC-137 contract. |
| RPC wakeup | A wakeup triggered by an external backend, agent or customer system through RPC. It can allow one or more addresses, or * when every RPC caller is allowed for a test. |
Example JSON files
The example JSON files are stored in the same GitHub folder as this Markdown file. Use these links when you want to download the exact examples used in this guide.
| Example | File | Use it for |
|---|---|---|
| KYC scenario example | Order_process_waits_for_KYC_and_continues_when_KYC_is_valid_scenario.json | Multi-session scenario with order process and KYC worker flow. |
| API saves test plan | xrc137_api_slow_json_ok_valid_default_multi_plan.json | Plan import example for checking an API save alias such as Ok = true. |
| Contract read test plan | xrc137_contractread_value_eq__valid_multi_plan.json | Plan import example for setup contract placeholders and contract read checks such as readValue = 42. |
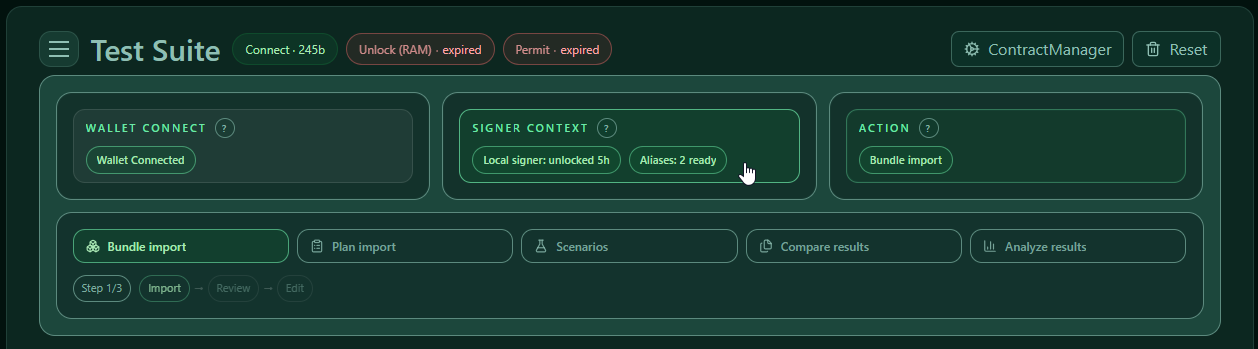
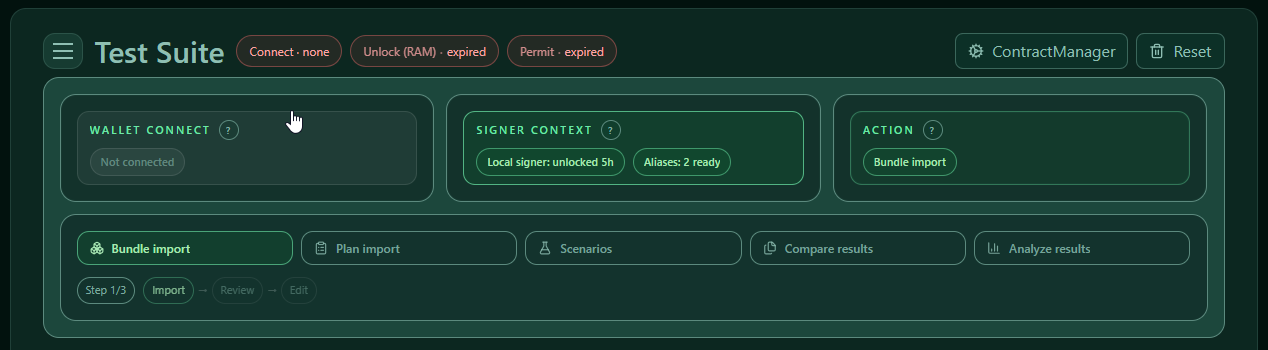
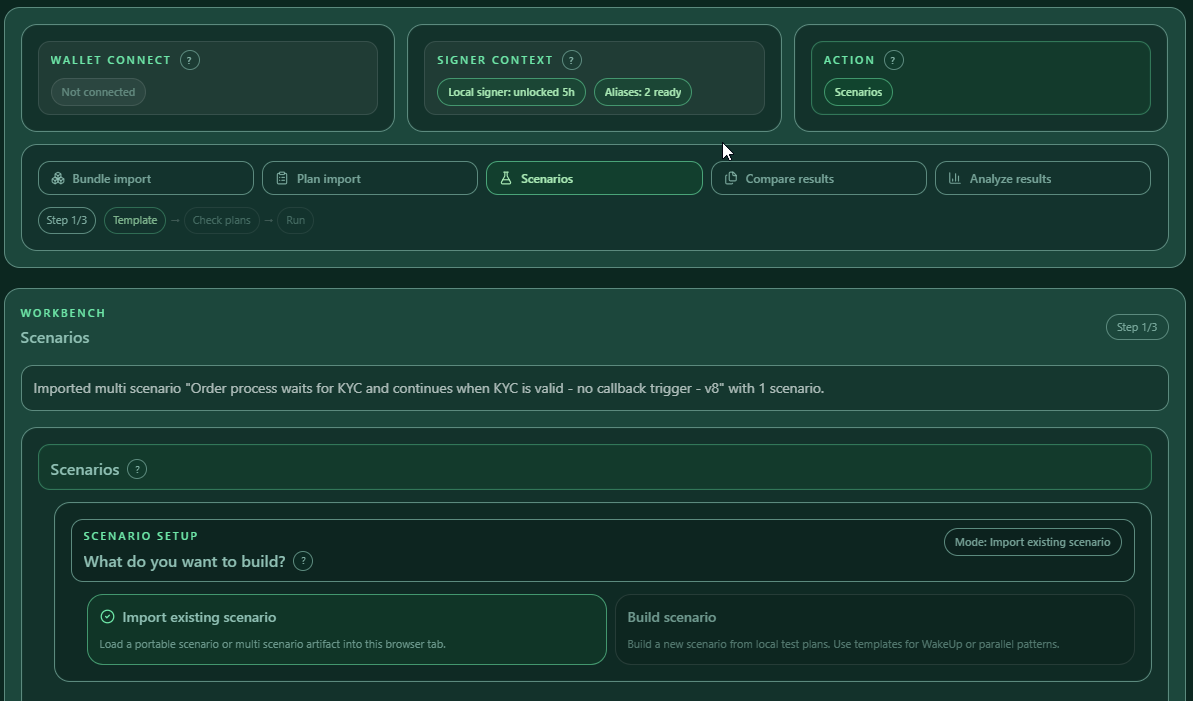
1. First orientation: the three top menu cards
The Test Suite starts with three cards:
| Card | What the user does there |
|---|---|
| Wallet connect | Connect or switch the active wallet, check chain and RPC context. |
| Signer context | Prepare the local signer and named alias signers. |
| Action | Choose the workbench, for example Bundle import, Plan import or Scenarios. |
Wallet connect
Use Wallet connect before every deploy or run. The wallet and chain define the environment for all following actions. A plan can be valid as JSON but still fail in practice if the wallet is not connected to the environment where the bundle contracts exist.
Steps:
- Open Wallet connect.
- Connect the browser wallet.
- Check that the connected address is the expected one.
- Check the selected network.
- Check RPC and explorer settings.
- Continue only when wallet and network match the contracts you want to use.
What to verify:
- The wallet is connected before a deploy or run is started.
- The current chain is the intended chain for the imported/deployed contracts.
- The connected account is not automatically the same as every test signer. If a plan uses aliases, prepare them in Signer context.

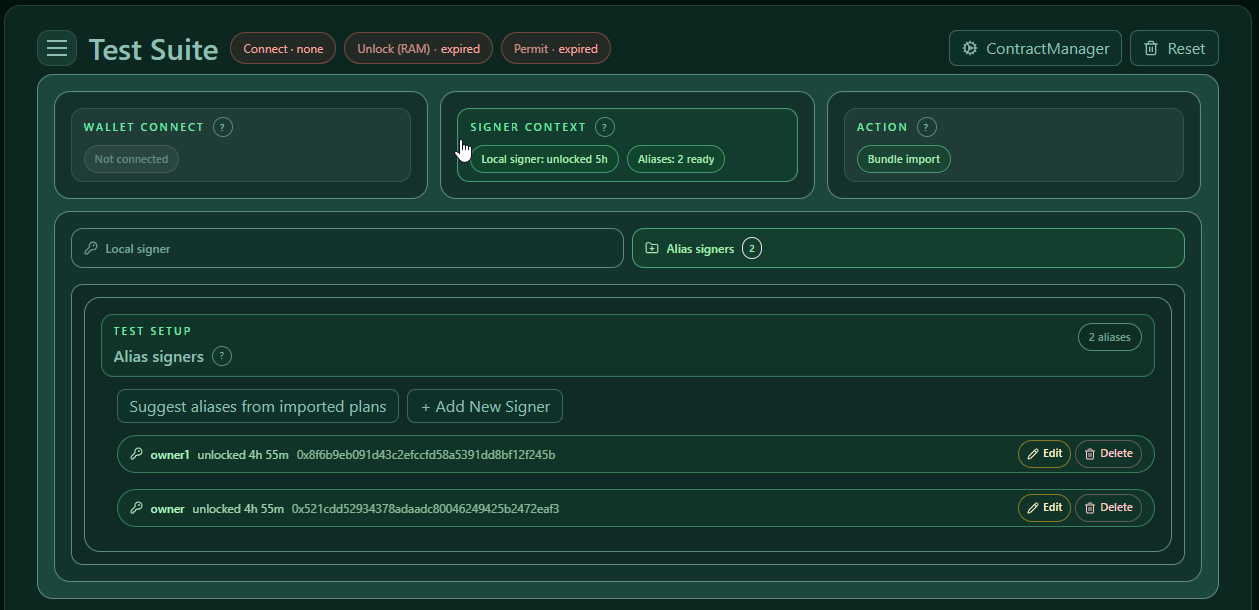
Signer context
Use Signer context when a plan uses named actors or aliases. This is important for multi-user tests, scenario runs and tests where owner, starter and executor are not the same identity.
There are two signer concepts:
| Signer concept | What it is used for |
|---|---|
| Local signer | A simple signer used when no named alias flow is required. |
| Alias signer | A named signer such as owner, owner1 or owner2. Plans and scenarios can refer to these names instead of hardcoding private keys. |
Example when using two actor aliases:
| Alias | Used for |
|---|---|
owner |
Order process plan |
owner1 |
KYC worker plan |
To prepare aliases:
- Open Signer context.
- Select Alias signers.
- Click Suggest aliases from imported plans. This creates alias entries from aliases referenced by imported plans.
- Add missing aliases manually with + Add New Signer.
- Store the private key or seed encrypted.
- Unlock the alias for the required TTL.
- Confirm that no required alias is shown as missing or locked.
A plan cannot be handed to Start Sessions if required aliases are missing or locked. This is intentional because the Test Suite must know which signer is allowed to start, deploy or execute the configured contract actions.
Action
Open Action and select what you want to do next. The selected action controls the workbench below the top cards.
| Action | Use case |
|---|---|
| Bundle import | Start with a bundle JSON and create local plans. |
| Plan import | Start with exported test plan JSON files. |
| Scenarios | Build or run multi-session scenarios. |
| Compare results | Compare two exported result bundles. |
| Analyze results | Inspect one result bundle deeply. |
A good practical order is:
- Prepare wallet and signers.
- Choose an action.
- Import or create test data.
- Edit runtime, setup and expectations.
- Deploy/rebind when needed.
- Run.
- Analyze or compare results.
2. Import data into the Test Suite
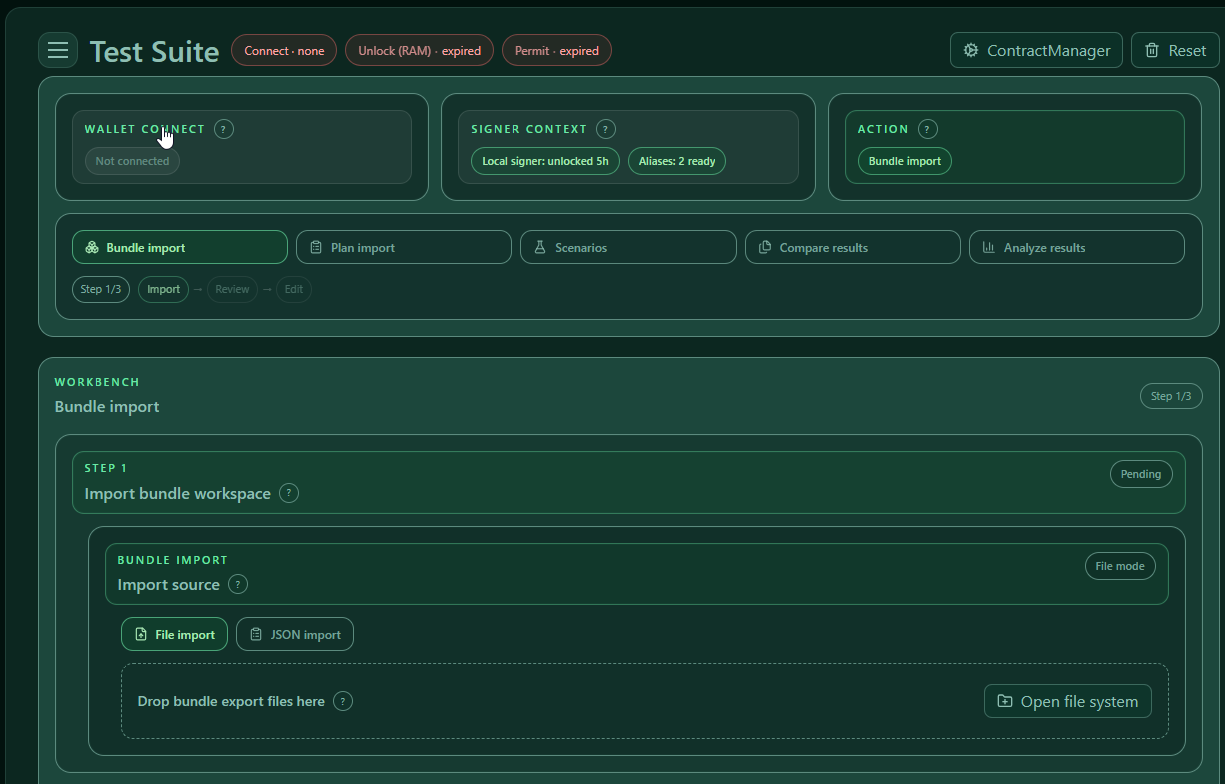
Bundle import
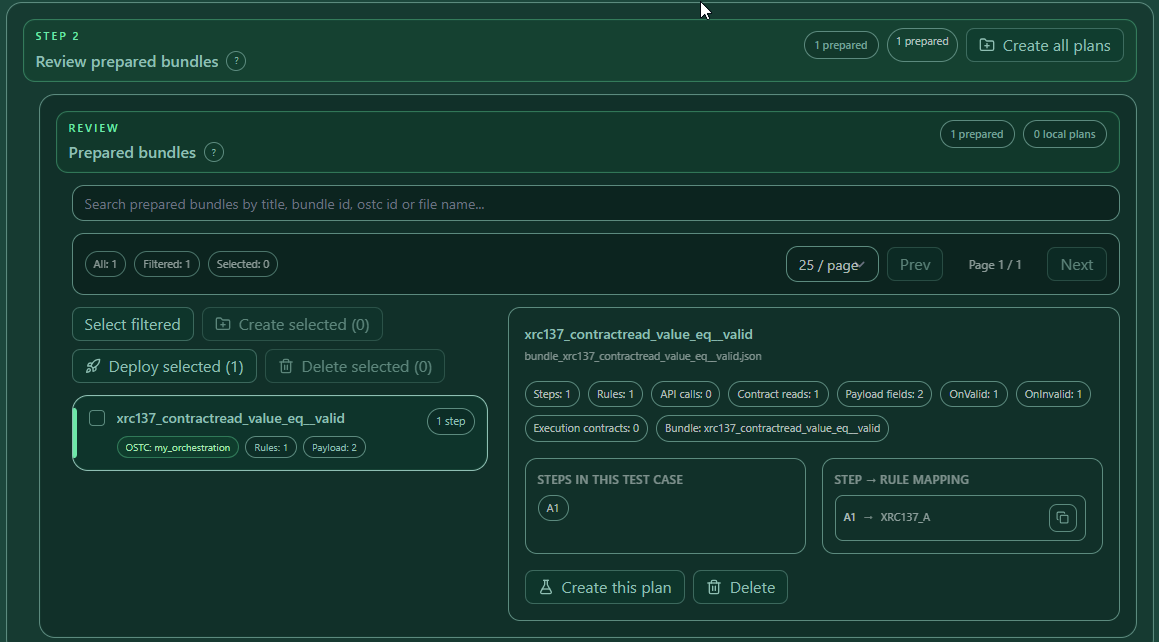
Use Bundle import if you start from a bundle and want the Test Suite to create a local test plan.
A bundle is not yet a test plan. Bundle import first reads the bundle, then creates a prepared bundle entry. Only after review do you create one or more local test plans from it.
Steps:
- Open Action.
- Select Bundle import.
- In Import bundle workspace, choose File import or JSON import.
- Load one or multiple bundle JSON files.
- Open Review prepared bundles.
- Select one prepared bundle.
- Check the summary: steps, rules, API calls, contract reads, payload fields, onValid/onInvalid outputs and execution contracts.
- Click Create this plan to create one local plan.
- Use Create all plans when every prepared bundle should become a local plan.
- Use Deploy selected when the prepared bundle should first go through BundleDeploy.
What the summary means:
| Summary item | Meaning |
|---|---|
| Steps | XRC-729 step ids detected in the orchestration. These become selectable start/final/timeline steps. |
| Rules | XRC-137 rules/contracts detected in the bundle. |
| API calls | API calls found in XRC-137 rules. These may later provide API save aliases for expectations. |
| Contract reads | Contract read definitions found in XRC-137 rules. These may later provide contract read aliases for expectations. |
| Payload fields | Input fields accepted by the XRC-137 payload schema. These become runtime payload fields and input payload check fields. |
| OnValid / OnInvalid | Output fields emitted by the rule paths, shown for review before creating a plan. |
| Execution contracts | Contracts involved in the execution/deploy context. |
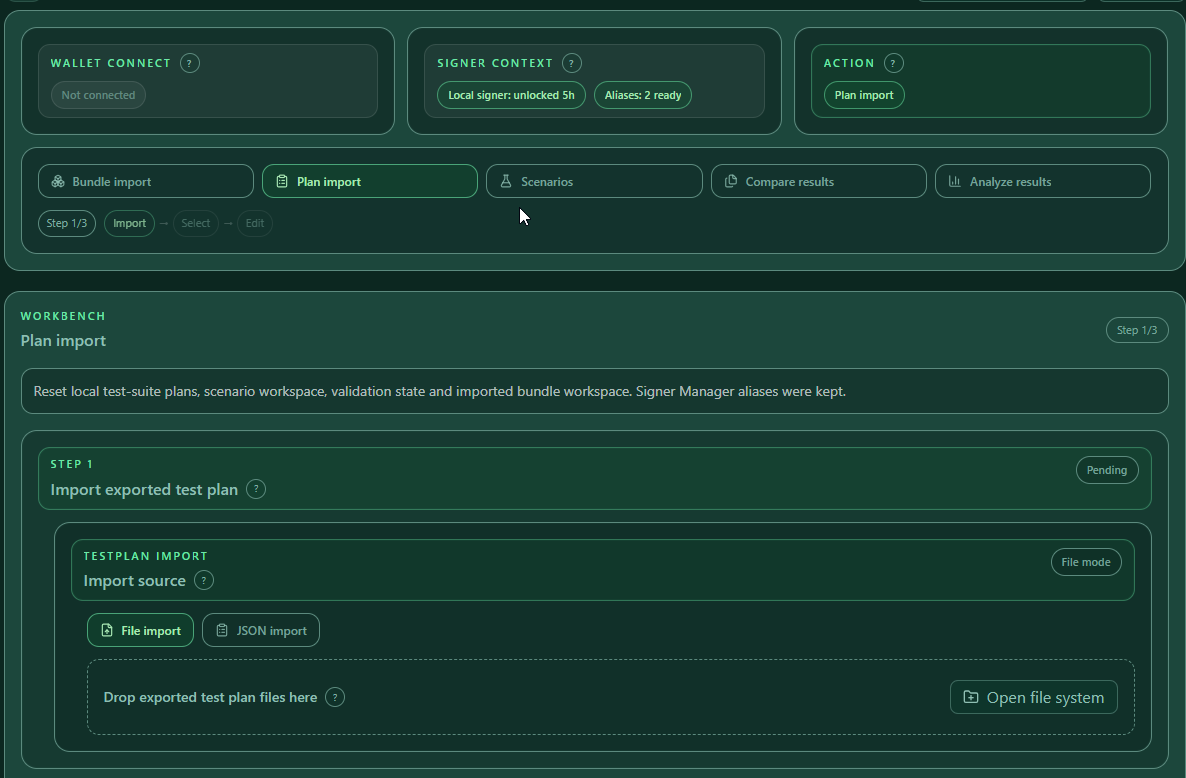
Plan import
Use Plan import if you already have exported test plans. A plan file already contains the test plan structure, so you can directly manage and edit it after import.
Steps:
- Open Action.
- Select Plan import.
- Choose File import or JSON import.
- Drop the JSON file or click Open file system.
- The imported plan appears in Manage test plans.
This works for one plan or many plans in one file. A multi-plan file is useful when a team wants to share a complete regression pack.
Create one multi-plan file
To combine several plans into one file:
- Import or create all local plans.
- Check the plans in Manage test plans.
- Open Export Plans.
- Click Export selected test plan.
- The downloaded JSON contains all checked plans.
Use this for customer handoff, regression packs, or reusable test collections. The exported file can be imported later through Plan import.
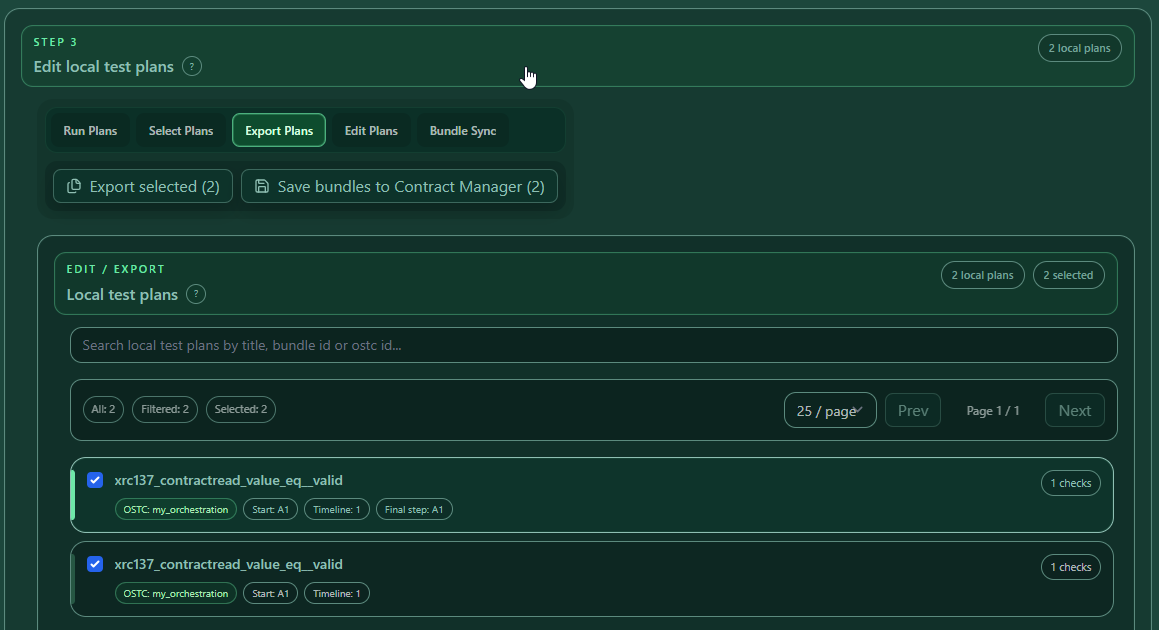
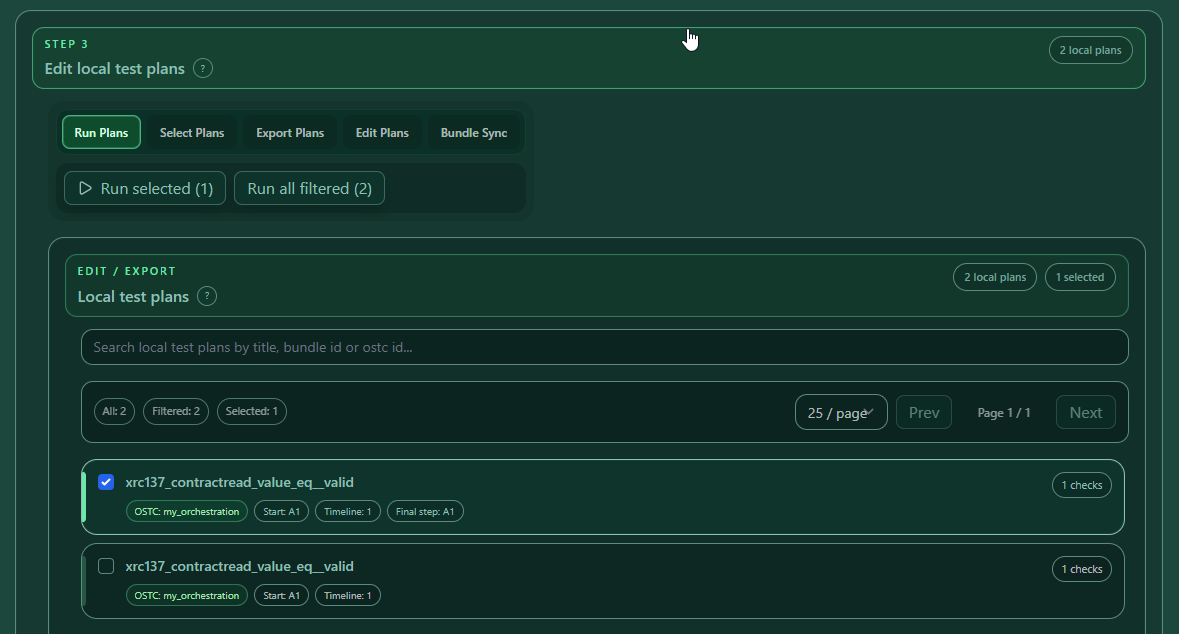
3. Manage local test plans
The Manage test plans area is the central working area after import. It lets you select plans, run plans, export plans, edit plans and sync plans with bundles.
Toolbar actions:
| Toolbar tab | Button | What it does |
|---|---|---|
| Run Plans | Run selected | Opens checked plans for execution. Use this when only selected plans should run. |
| Run Plans | Run all filtered | Runs all currently filtered plans. Use this after filtering a plan list. |
| Select Plans | Select filtered | Checks all plans matching the current search/filter. |
| Select Plans | Clear selected | Clears the current checked selection. |
| Export Plans | Export selected test plan | Exports checked plans into one JSON file. |
| Export Plans | Export selected bundle | Exports the embedded bundle data from selected plans, when this action is available. Use this when the customer needs the deployable bundle file, not the test plan wrapper. |
| Export Plans | Save bundles to Contract Manager | Extracts embedded bundles from selected plans and saves them to Contract Manager. |
| Edit Plans | Add plan JSON | Imports additional plan JSON into the local workspace. |
| Edit Plans | Replace selected | Replaces exactly one selected plan with another imported plan. This is disabled unless exactly one plan is selected. |
| Edit Plans | Delete selected | Removes checked local plans. |
| Edit Plans | Delete filtered | Removes all filtered local plans. |
| Bundle Sync | Rebind selected | Rebinds selected plans to a newly deployed bundle. Use this after addresses changed. |
| Bundle Sync | Validate selected | Validates selected plans against a bundle. Use this to verify that the plan still matches the bundle. |
| Bundle Sync | Deploy bundles | Opens deploy flow for selected plans. |
When one plan is open, the selected-plan action bar has its own actions:
| Selected plan tab | Button | What it does |
|---|---|---|
| Run Plan | Open in Start Sessions | Opens the selected plan in Start Sessions for final review and execution. |
| Export Plan | Export plan | Downloads the selected plan JSON. |
| Export Plan | Save bundle to Contract Manager | Saves the selected plan's embedded bundle to Contract Manager. |
| Export Plan | Deploy bundle | Opens BundleDeploy for the selected plan's embedded bundle. |
| Edit Plan | Save local plan | Stores current local edits. |
| Edit Plan | Duplicate | Creates a copy of the selected plan. |
| Edit Plan | Delete | Removes the selected plan. |
4. Runtime configuration
Open one local plan. The editor has three main tabs:
- Runtime
- Expectations
- Setup contracts
Inside Runtime, the plan has four sub-areas: Start setup, Aliases, Payload and Wakeups. Start setup defines how the session starts, Payload defines the start input data, Aliases define signer roles, and Wakeups define who may wake waiting steps.
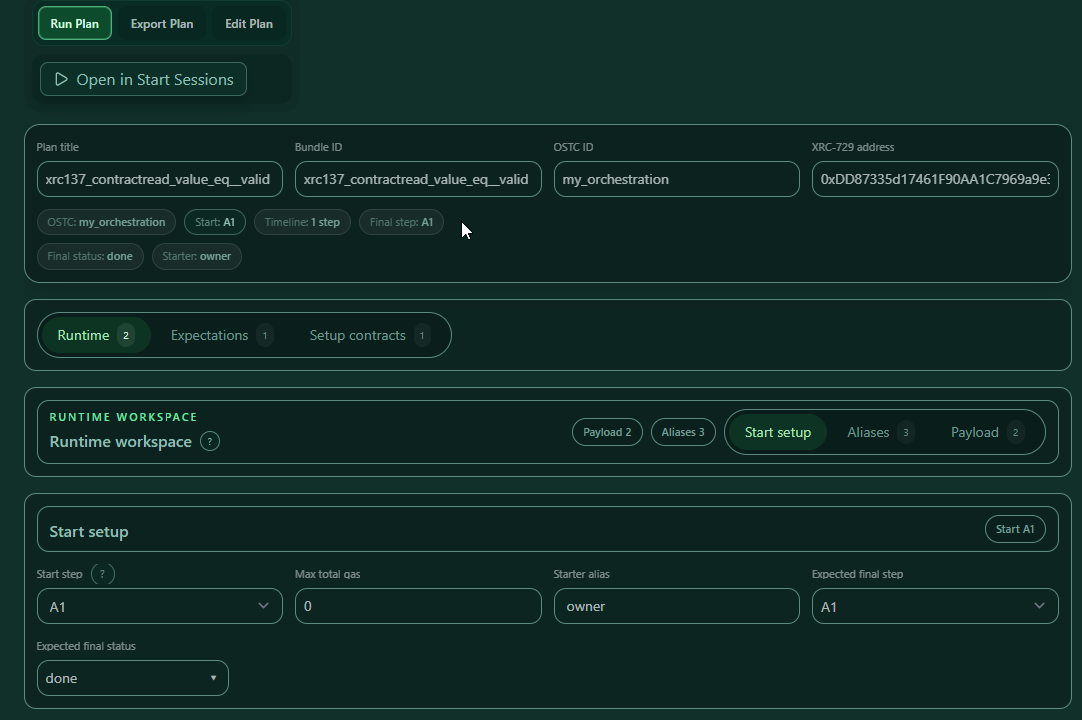
Runtime → Start setup
Start setup defines how the session starts and which final result is expected.
Example from the scenario order plan:
| Field | Value |
|---|---|
| Start step | receive_order |
| Starter alias | owner |
| Expected final step | fulfill_order |
| Expected final status | done |
| Max total gas | 0 |
Field details:
| Field | What the user should enter |
|---|---|
| Start step | Select the first XRC-729 step that should be triggered. This must be one of the steps detected from the plan/bundle. |
| Starter alias | Enter the alias that should start the session. If this alias is set, prepare it in Signer context. |
| Expected final step | Select the step where the run should finish. Use Any only when the exact final step is not part of the test requirement. |
| Expected final status | Select the status that should be reached, for example done. The editor supports final statuses such as running, waiting, done and aborted. |
| Max total gas | Enter the gas limit if the plan needs it. 0 means no explicit total gas limit is configured in the plan. |
Steps:
- Select the plan.
- Open Runtime.
- Open Start setup.
- Choose the start step.
- Enter the starter alias.
- Choose expected final step.
- Select expected final status.
- Save the plan.
Runtime → Payload
Payload is the data sent into the start step. Payload fields are tied to the selected start step schema. If the selected start step has no payload fields, the editor shows that no payload fields are available.
Example from the order scenario start payload:
{
  "orderId": "ORD-KYC-1001",
  "customerId": "CUST-KYC-1001",
  "cartId": "CART-1001",
  "totalAmount": 19900,
  "currency": "EUR",
  "applicantConsent": true
}
How to fill payload values:
- Open Runtime.
- Select Payload.
- Find the field from the start step schema.
- Enter the value:
- string:
ORD-KYC-1001 - number:
19900 - boolean:
trueorfalse - object/array: valid JSON
- Use the default toggle only when the schema default should be used.
- Save the plan.
When a field is disabled, it is not sent explicitly. The editor marks it as default active. Enable it again when you want to send a concrete value.
For the contract read example, enter:
| Field | Value |
|---|---|
| AmountA | 50 |
| AmountB | 5 |
Runtime → Wakeups
Use Wakeups when a process has one or more waiting steps that must be continued by another process or by an external RPC caller.
The Test Suite stores wakeup rules in the test plan under runtime.wakeUp. When the plan is opened in Start Sessions or run from the Test Suite, this is converted into the runtime transfer format payload.__wakeUp. This keeps the editable test plan clean while still using the payload format expected by the session start flow.
Wakeup configuration supports:
| Wakeup type | Use it when | Configuration |
|---|---|---|
| Internal | Another XRC process or XRC-137 rule should wake the waiting step. | Configure allow for allowed caller addresses and optionally fromXRC137 for allowed source rule contracts. |
| RPC | A customer backend, API service, AI agent or other external system should wake the waiting step through RPC. | Configure one or more RPC caller addresses, or * for every RPC caller in a test setup. |
| Default | The same wakeup rule should apply to all waiting steps. | Configure the default section. |
| Step-specific | Only one waiting step should be wakeable by a specific caller. | Add the step and configure its internal/RPC rules. |
Example with one internal wakeup and one external RPC wakeup:
{
  "wakeUp": {
    "steps": {
      "wait_for_kyc_result": {
        "internal": {
          "allow": ["0x1111111111111111111111111111111111111111"],
          "fromXRC137": ["0x2222222222222222222222222222222222222222"]
        }
      },
      "wait_for_customer_approval": {
        "rpc": ["0x3333333333333333333333333333333333333333"]
      }
    }
  }
}
How to configure wakeups in a test plan:
- Open the plan.
- Open Runtime.
- Select Wakeups.
- Switch the wakeup allowlist from Off to Allowlist.
- Choose Default Configuration or Step-specific Configuration.
- For an internal wakeup, open Internal and add allowed caller addresses.
- Add From XRC-137 only when the wakeup must come from a specific rule contract.
- For an external wakeup, open RPC and add the backend/customer/agent caller address.
- Use
All (*)only for a controlled test setup. Avoid it for customer production-like examples. - Save the plan.
Important rules:
- Do not enter
__wakeUpmanually in Payload for new plans. - Use Runtime → Wakeups instead.
- Imported older plans that still contain
payload.__wakeUpcan be normalized into the new wakeup area. - The final Start Sessions payload still contains
__wakeUp, because that is the runtime format used by the session start request. - If you start a plan individually, the wakeup rules travel with the plan. They are no longer only hidden in the scenario step payload.
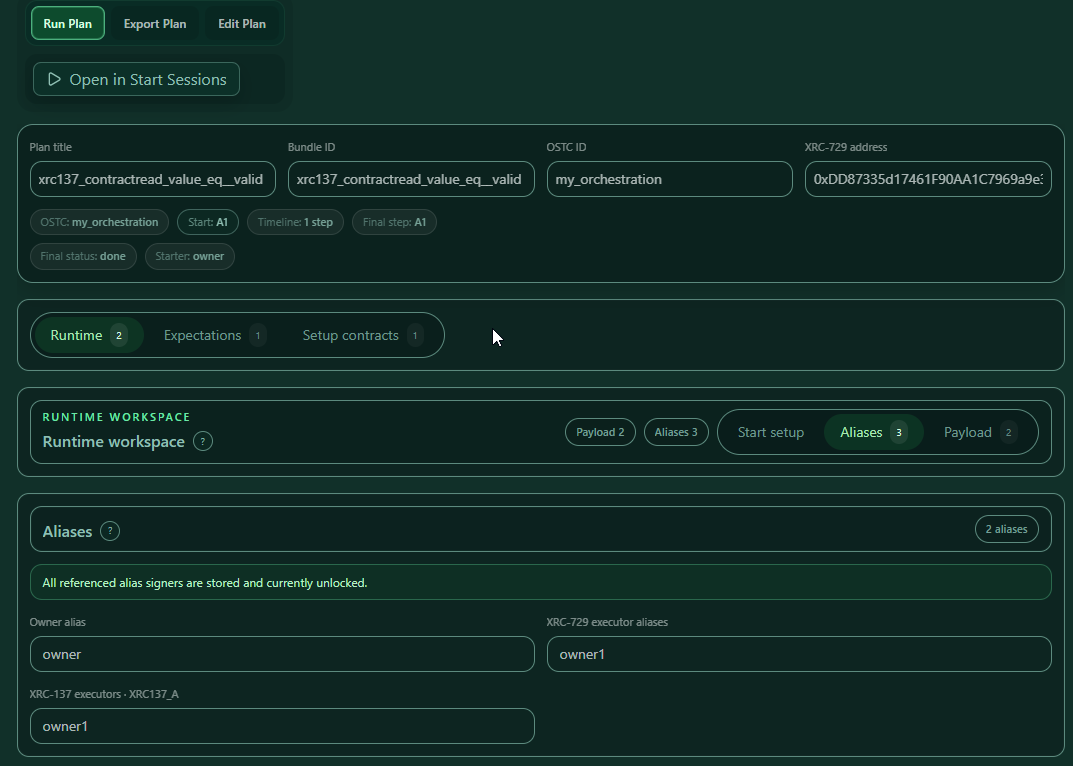
Runtime → Aliases
Aliases define who owns, starts and executes the plan.
| Field | Meaning |
|---|---|
| Owner alias | Signer used for owner/setup/grant/deployment-related actions. |
| Starter alias | Signer used to start the session. |
| XRC-729 executor aliases | Signers allowed to execute the orchestration. |
| XRC-137 executors · contract alias | Signers allowed to execute a specific rule contract. |
Example:
| Plan | Owner alias | Starter alias |
|---|---|---|
Order KYC wakeup process - valid KYC path - no callback trigger - v8 |
owner |
owner |
KYC worker wakeup process - valid path - no callback trigger - v8 |
owner1 |
owner1 |
How to set custom executors:
- Open Runtime.
- Select Aliases.
- Enter Owner alias.
- Enter Starter alias.
- Enter XRC-729 executors separated by commas.
- Enter XRC-137 executors per contract alias.
- Open Signer context → Alias signers.
- Ensure all aliases are stored and unlocked.
- Save the plan.
Why this matters: a real multi-user test often needs more than one identity. The owner may deploy or own the setup, the starter may start a session, and a different executor may be allowed to execute a specific XRC-137 rule.
5. Setup contracts for contract reads
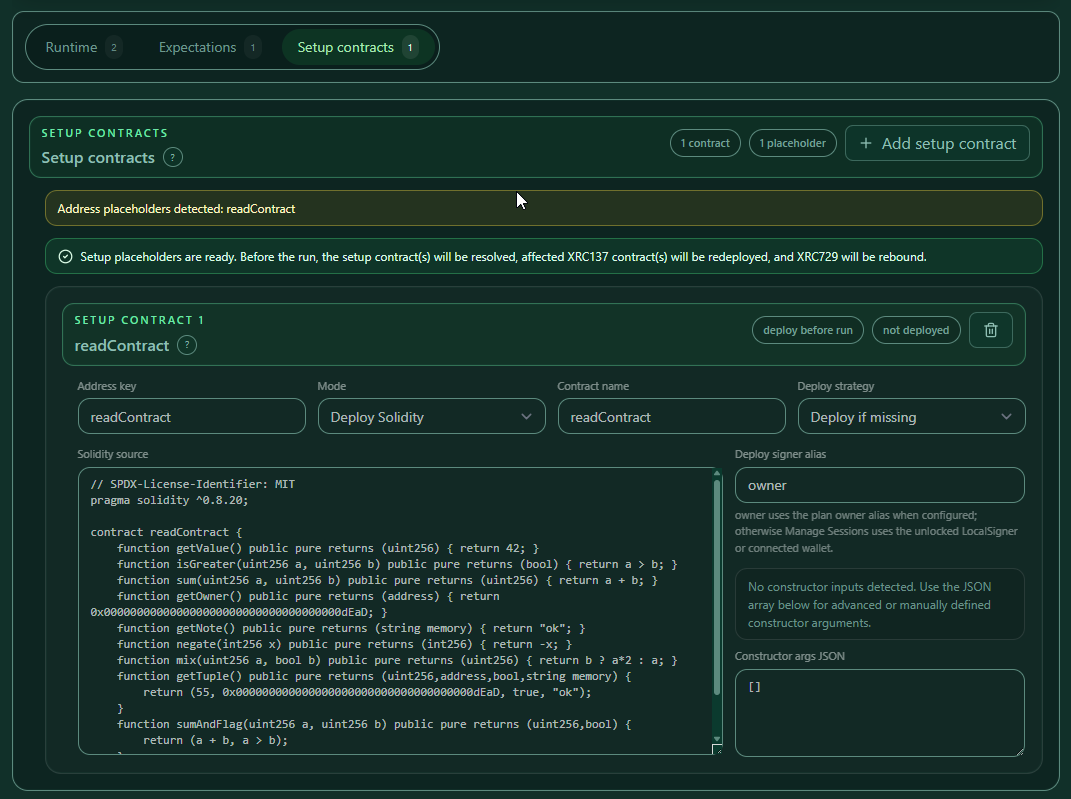
Use Setup contracts when a test needs a helper contract deployed or supplied before the run.
A common use case is an XRC-137 rule that contains a contract read target like ${addr:readContract}. The Test Suite must resolve this placeholder before the run. It can do this by deploying a setup contract or by using a fixed address.
Contract read example:
| Field | Value |
|---|---|
| Plan | xrc137_contractread_value_eq__valid |
| Address key | readContract |
| Contract read target | ${addr:readContract} |
| Function | getValue()(int256) |
| Saved read alias | readValue |
| Deploy signer alias | owner |
The XRC-137 reads from ${addr:readContract}. The setup contract must therefore create or provide the address behind readContract.
Setup contract fields:
| Field | What it means |
|---|---|
| Address key | The key used inside placeholders, for example readContract for ${addr:readContract}. |
| Mode | Choose Deploy Solidity when the Test Suite should deploy source code, or Use fixed address when the contract already exists. |
| Contract name | The Solidity contract name to deploy. |
| Deploy strategy | Deploy if missing deploys when no address is available. Deploy always deploys a fresh instance. |
| Fixed address | Used only in fixed address mode. It must be a valid EVM address. |
| Solidity source | Source code used for deploy mode. |
| Deploy signer alias | Alias used for deployment. The UI hint explains that owner uses the plan owner alias when configured. |
| Constructor args JSON / form | Constructor arguments. If no constructor inputs exist, use []. |
Steps to configure a setup contract:
- Open the plan.
- Click Setup contracts.
- Click Add setup contract if no setup contract exists.
- Set Address key to
readContract. - Set Mode to Deploy Solidity.
- Set Contract name to
readContract. - Paste the Solidity source.
- Keep Constructor args JSON as
[]if there is no constructor. - Set Deploy signer alias to
owner. - Save the plan.
- Deploy or run through the flow that resolves setup placeholders.
The relevant Solidity function in the example is:
function getValue() public pure returns (uint256) { return 42; }
When setup placeholders are ready, the Test Suite indicates that affected XRC-137 contracts can be redeployed and XRC-729 can be rebound before the run. If something is missing, the UI lists missing setup contracts or contracts that are not deployable yet.
6. Expectations
Expectations define what must happen during execution. In simple words, an expectation is a rule for the test result. If all required expectations pass, the run can be considered correct.
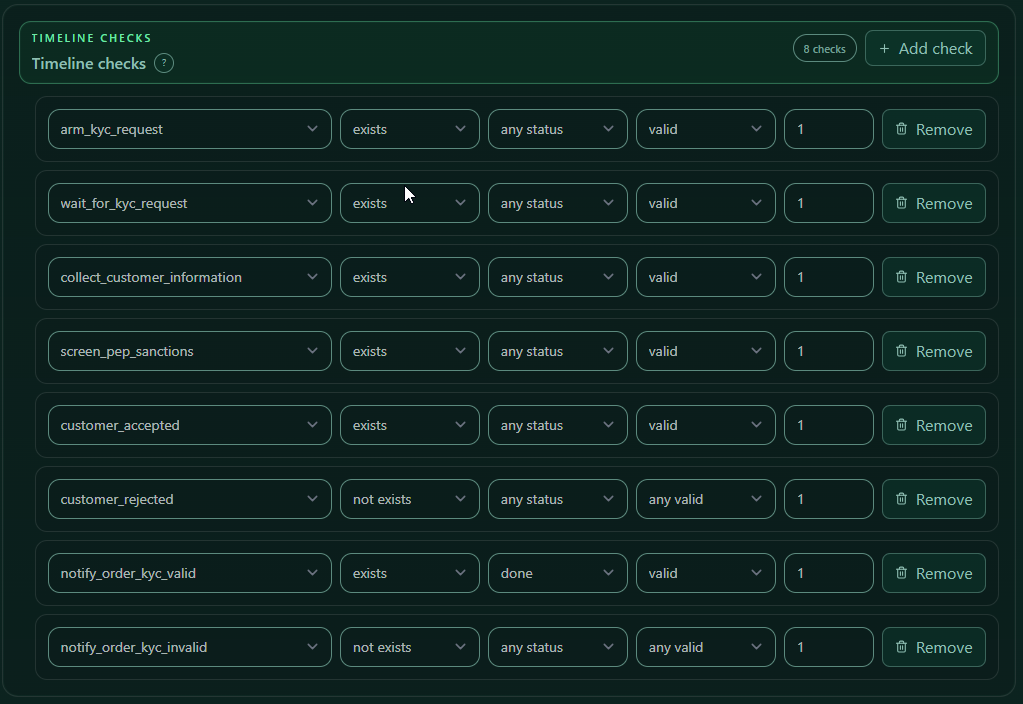
What is a timeline check?
A timeline check verifies one expected step occurrence during execution. It answers questions like:
- Did step
receive_orderappear? - Did it appear once or multiple times?
- Was the step valid?
- Did the step reach status
done,waiting,abortedor any status? - Did the input payload contain the expected values?
- Did API or contract read values match the expected values?
A timeline entry is a group. A group can contain one or more alternatives. The match mode controls how alternatives are evaluated:
| Match mode | Meaning |
|---|---|
| anyOf | At least one alternative must match. |
| allOf | All alternatives in the group must match. |
| Field | Example | Meaning |
|---|---|---|
| Group label | fulfill_order #1 |
Readable label for the expectation. |
| Match mode | allOf |
How alternatives inside the group are evaluated. |
| Step | fulfill_order |
Step id to check. |
| Occurrence | 1 |
Which occurrence of the step to check. 1 means the first occurrence. |
| Expect step | exists / not exists |
Whether the step should appear. Use not exists for negative path checks. |
| Expected valid | true / false / any |
Whether the rule result must be valid. Use any if validity is not part of this test. |
| Expected status | done / waiting / any |
Optional status expectation. Use any status when only existence/validity matters. |
Order process example:
| Step | Expect step | Expected valid | Expected status |
|---|---|---|---|
receive_order |
exists | true | any |
request_kyc |
exists | true | done |
wait_for_kyc_result |
exists | true | any |
fulfill_order |
exists | true | done |
cancel_order |
not exists | any | any |
Steps to create a timeline entry:
- Open Expectations.
- Click Add expected step.
- Select the new row.
- Enter Group label.
- Choose Match mode.
- Select Step.
- Enter Occurrence.
- Set Expect step.
- Set Expected valid.
- Set Expected status if needed.
- Save the plan.
Input payload checks
Input payload checks verify the actual input payload of a step. They are useful when a step may exist and be valid, but you also need to prove that the right data was used.
Example: the step can be checked for AmountA = 50 and AmountB = 5.
| Field | Operator | Expected value |
|---|---|---|
| AmountA | = | 50 |
| AmountB | = | 5 |
Steps:
- Open Expectations.
- Select timeline entry
A1 #1. - Open Input payload checks.
- Click Add payload field.
- Select field
AmountA. - Select operator
=. - Enter expected value
50. - Click Add payload field again.
- Select
AmountB. - Select operator
=. - Enter expected value
5. - Save the plan.
Operator behavior:
| Field type | Operators shown by the editor |
|---|---|
| Numeric | =, !=, exists, missing, >, >=, <, <= |
| Boolean | =, !=, exists, missing |
| String-like | =, !=, exists, missing, contains, not contains, starts with, ends with, regex |
| Object / array / JSON | existence-style checks only |
The expected value is parsed based on the field type. For example true / false become booleans, numeric strings become numbers for numeric fields, and JSON objects/arrays are parsed when valid JSON is entered.
API saves checks
API saves checks verify values saved from an API response. The selectable fields come from the XRC-137 API extract aliases for the selected step. If the selected step has no API extract aliases, the editor shows that no API save aliases are available.
API example:
| Item | Value |
|---|---|
| URL | https://api.test.xgr.network/slow |
| Extract aliases | Ok, notOk |
| Expected check | Ok = true |
Steps:
- Open Expectations.
- Select timeline entry
A1 #1. - Open API SAVES CHECKS.
- Click Add check.
- Select field
Ok. - Select operator
=. - Enter
true. - Save the plan.
Use API saves checks only for values saved by the rule's API extract map. Do not type arbitrary field names; choose from the available fields in the editor.
Contract read checks
Contract read checks verify values saved from contractReads.saveAs. They are similar to API saves checks, but the value comes from a contract read instead of an API response.
Contract read example:
| Item | Value |
|---|---|
| Target | ${addr:readContract} |
| Function | getValue()(int256) |
| Saved alias | readValue |
| Expected value | 42 |
Steps:
- Open Expectations.
- Select timeline entry
A1 #1. - Open CONTRACT READ CHECKS.
- Click Add check.
- Select field
readValue. - Select operator
=. - Enter
42. - Save the plan.
If no field is available, the selected step has no contract read save aliases in the imported XRC-137 contractReads.saveAs map.
7. Scenarios
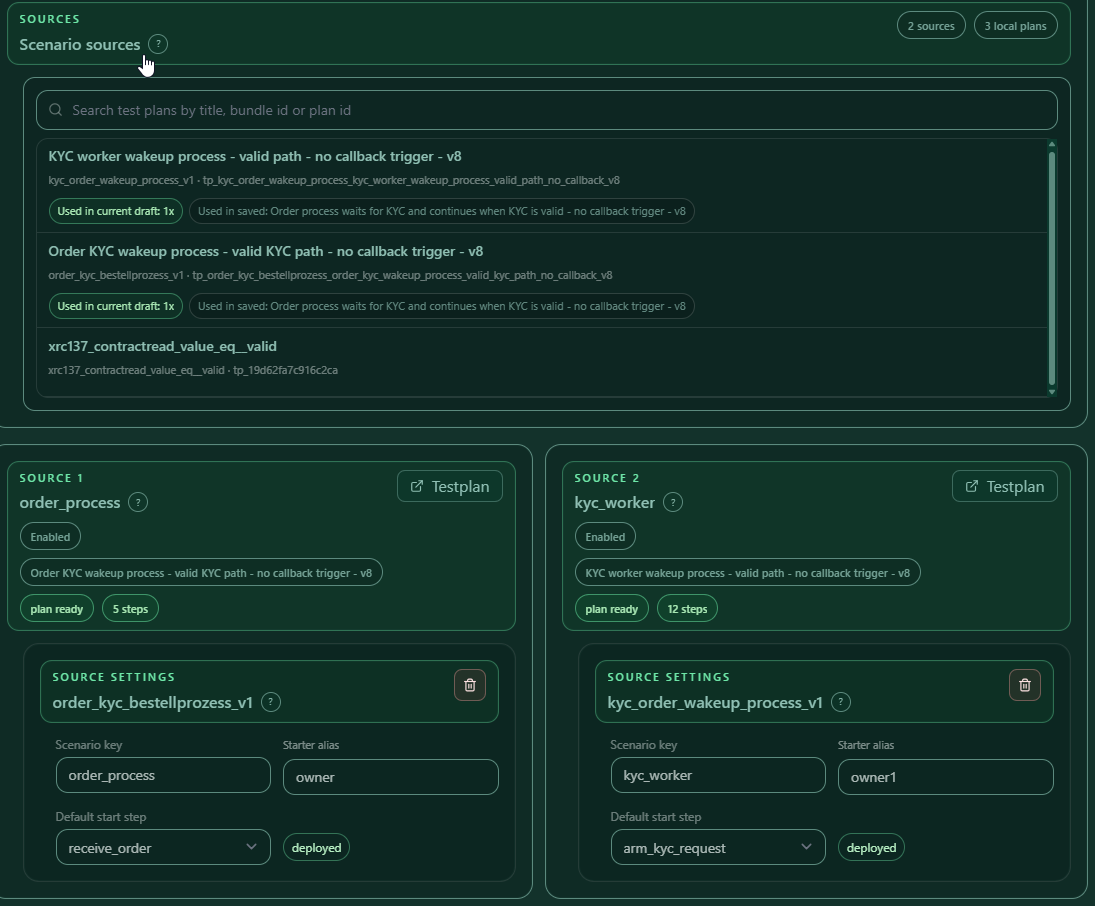
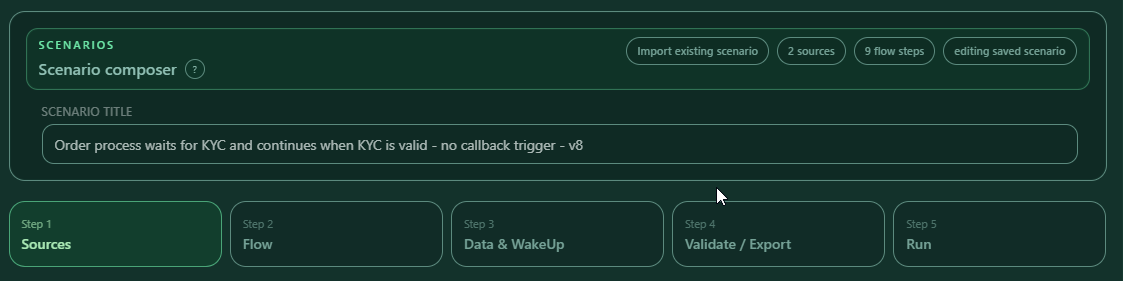
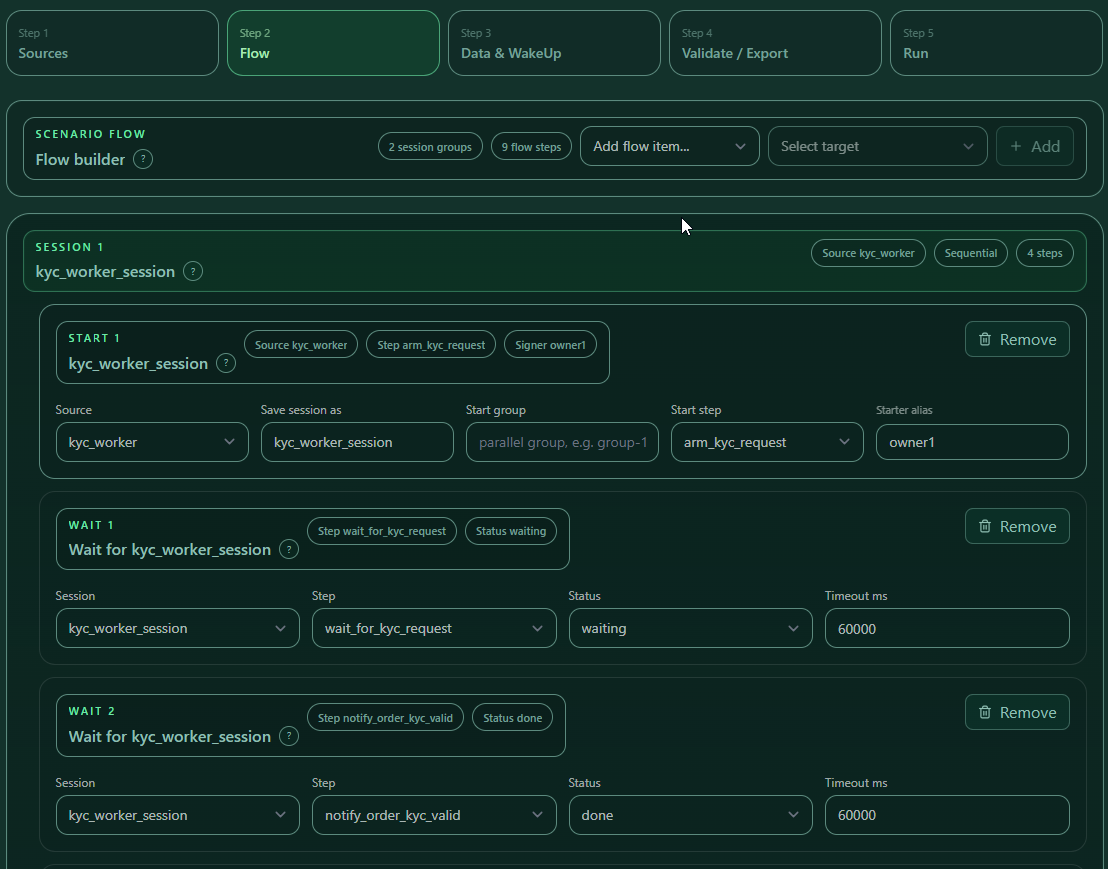
Use Scenarios when several sessions must work together. A scenario can import or reuse test plans, define actor aliases, set payload data, configure wake-up rules, validate the whole scenario package and then run a multi-session flow.
A scenario is not just one plan. It is a flow around several plans. The scenario editor turns imported scenario data into sources and flow steps. Supported flow concepts include starting sessions, waiting for steps and asserting sessions.
Scenario example:
| Plan key | Bundle | Start step | Actor | Final step |
|---|---|---|---|---|
order_process |
order_kyc_bestellprozess_v1 |
receive_order |
owner |
fulfill_order |
kyc_worker |
kyc_order_wakeup_process_v1 |
arm_kyc_request |
owner1 |
notify_order_kyc_valid |
Scenario import and sources
Use Scenario import when the scenario JSON already contains the scenario, embedded plans and bundle data.
Steps:
- Open Action → Scenarios.
- Use the import area to load a scenario JSON file.
- Check the detected scenario title.
- Check the imported plan count and bundle count.
- Save or replace the local Test Suite workspace when the scenario should be the active working set.
Use Sources to inspect which scenario JSON, embedded plans and bundle source data were imported. A source is a plan/bundle reference that the scenario can use later in its flow. This is where users can confirm that the scenario points to the expected plans before running it.
Scenario flow menu
The scenario flow is split into dedicated editing areas. Work left to right:
| Area | Purpose |
|---|---|
| Data / WakeUp | Runtime payload data and wake-up permissions. |
| Sessions | startSession and waitForStep flow steps. |
| Timeline checks | Expected steps and statuses inside sessions. |
| Asserts | Final session assertions. |
| Validate / Export | Validate the scenario and export the package. |
| Run | Start and monitor the scenario run. |
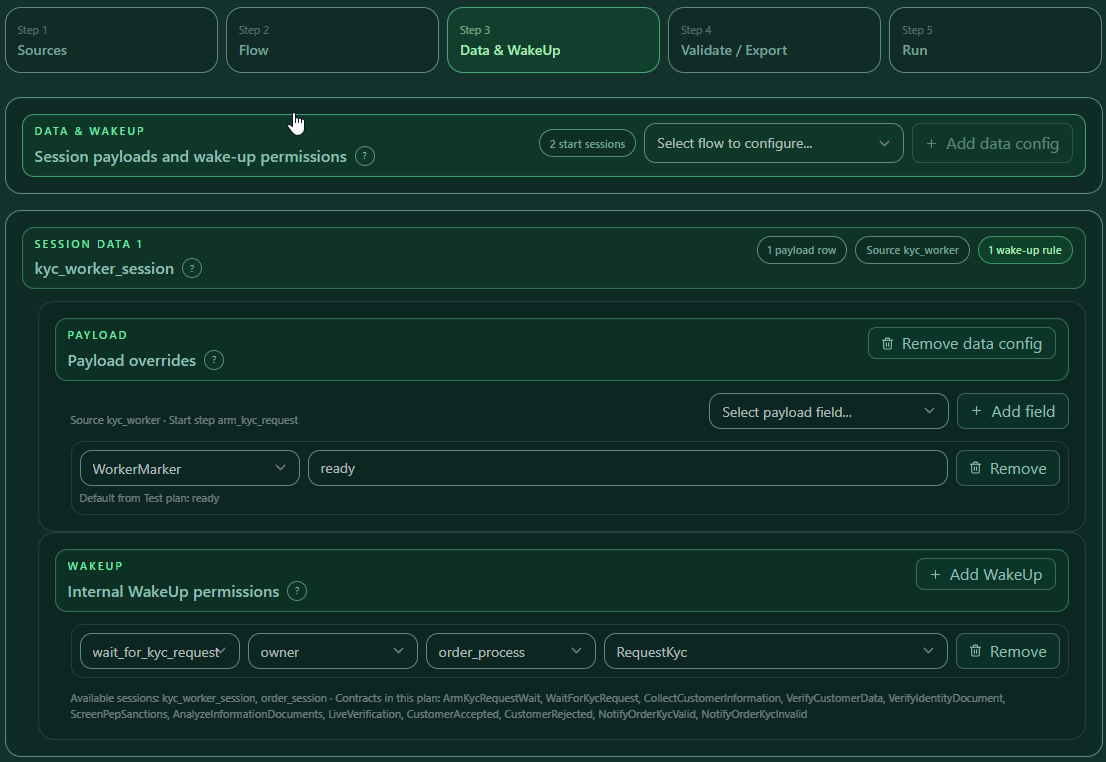
Data and WakeUp
The scenario can use wakeup rules in two places:
| Place | Meaning |
|---|---|
Plan runtime.wakeUp |
Wakeup rules stored directly in an embedded test plan. These rules are also available when the plan is run alone. |
Scenario startSession.runtime.wakeUp |
Wakeup rules that are specific to one scenario start step. These can extend or override the embedded plan for that scenario run. |
At runtime, both forms are materialized into the session start payload as payload.__wakeUp. This allows one session to wake a waiting step in another session, or allows an external RPC caller to wake a waiting step.
Internal wakeup example:
"runtime": {
  "stepId": "receive_order",
  "wakeUp": {
    "steps": {
      "wait_for_kyc_result": {
        "internal": {
          "allow": ["$actor.address:owner1"],
          "fromXRC137": ["$contract.address:kyc_worker:NotifyOrderKycValid"]
        }
      }
    }
  }
}
Meaning:
wait_for_kyc_resultis the waiting step.owner1is allowed to perform the wakeup.- The wakeup must come from the
NotifyOrderKycValidXRC-137 contract in thekyc_workerplan.
External RPC wakeup example:
"runtime": {
  "stepId": "receive_order",
  "wakeUp": {
    "steps": {
      "wait_for_customer_approval": {
        "rpc": ["0x3333333333333333333333333333333333333333"]
      }
    }
  }
}
Meaning:
wait_for_customer_approvalis the waiting step.- The external RPC caller must use the configured address.
- This is useful for customer backends, API workers, AI agents or external automation that should continue a waiting process.
In practice, check this carefully before running:
- For internal wakeups, the actor alias in
allowmust exist in Signer context. - For internal wakeups, the referenced plan key, for example
kyc_worker, must exist in the scenario sources. - For internal wakeups, the referenced contract alias, for example
NotifyOrderKycValid, must exist in that plan/bundle. - For RPC wakeups, the configured address must be the address that will sign or authorize the RPC wakeup.
- The waiting step must match the step that should be woken.
- Validate the scenario before export or run.
Session flow steps
The scenario uses these step types:
| Step type | What it does |
|---|---|
startSession |
Starts a session from a plan/source. It creates a real session that can later be waited on or asserted. |
waitForStep |
Waits until a named session reaches a specific step and status. Use this to coordinate multi-session flows. |
assertSession |
Checks the final result of a session. This is the scenario-level assertion step. |
Example flow:
- Start KYC worker with
arm_kyc_requestasowner1. - Wait until the KYC worker reaches
wait_for_kyc_requestwith statuswaiting. - Start order process with
receive_orderasowner. - Wait until
request_kycis done. - Wait until
wait_for_kyc_resultis waiting. - Wait until the KYC worker sends
notify_order_kyc_valid. - Assert the order session final step
fulfill_order. - Assert the KYC worker final step
notify_order_kyc_valid.
Timeline checks and asserts
Timeline checks define which steps are expected during a session and with which status. Use them to check that positive paths appear and negative paths do not appear.
A scenario assert is a final verification for a started session. It can include:
- expected final status
- expected final step
- expected timeline entries with step id, status, occurrence, existence and valid flag
For example, an order scenario can assert that fulfill_order is reached and cancel_order is not reached.
Asserts validate the final state of a session, for example final status and final step. If an assert fails, the scenario result is not just a visual warning; it means the scenario did not behave as defined.

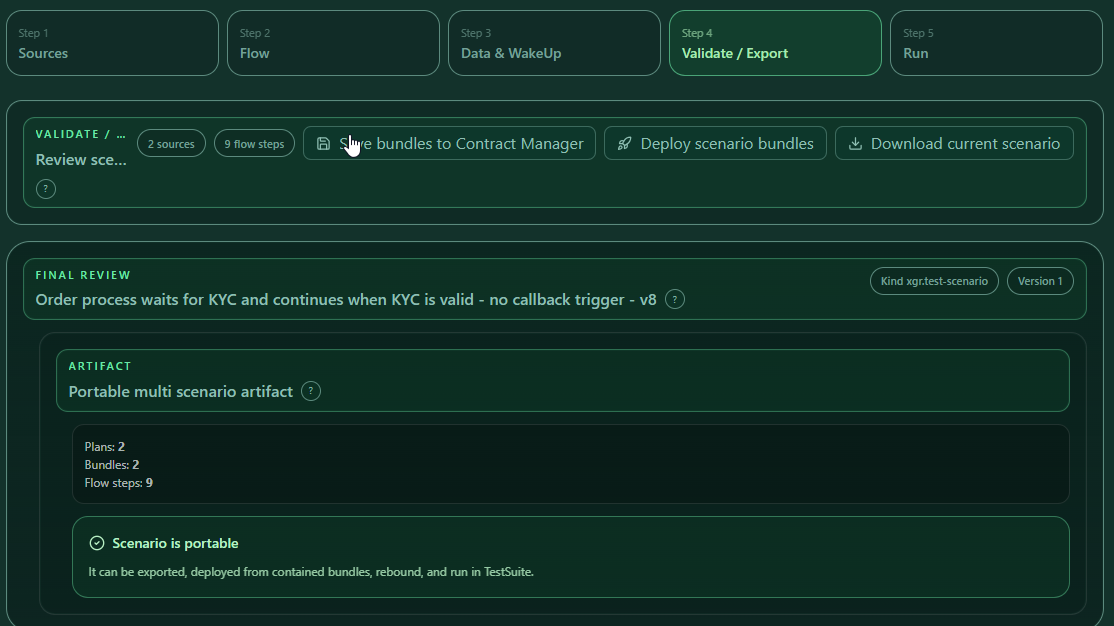
Validate, export and run
Before running or sharing a scenario:
- Validate the scenario package.
- Confirm that all referenced plans, actors, bundles and wake-up references resolve, including internal source contracts and external RPC addresses.
- Export the scenario package if another user should run the same flow.
- Run the scenario from the Run panel.
Validation should be used before a handoff because it checks whether the scenario references still point to the data that exists in the workspace.
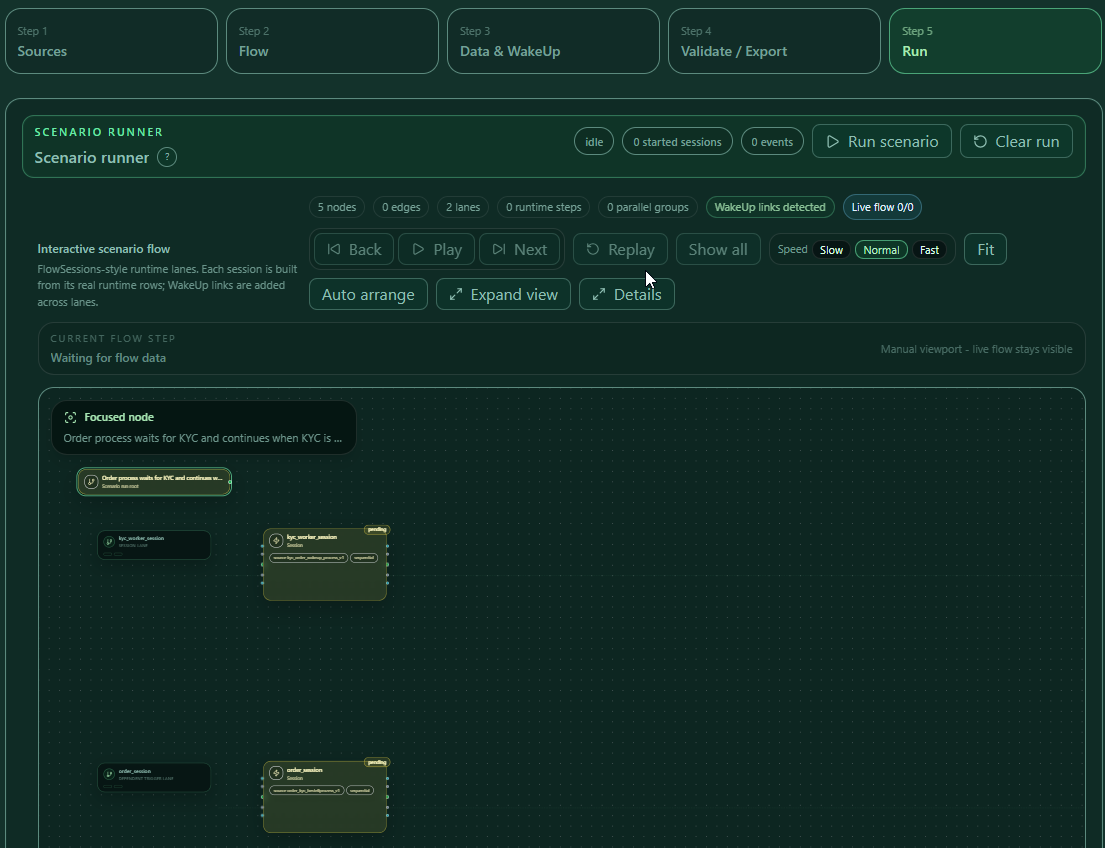
When the scenario is running or finished, use the graph and detail panel to inspect the current state. The runner shows scenario status, started session count and event count, and provides Run scenario and Clear run actions.
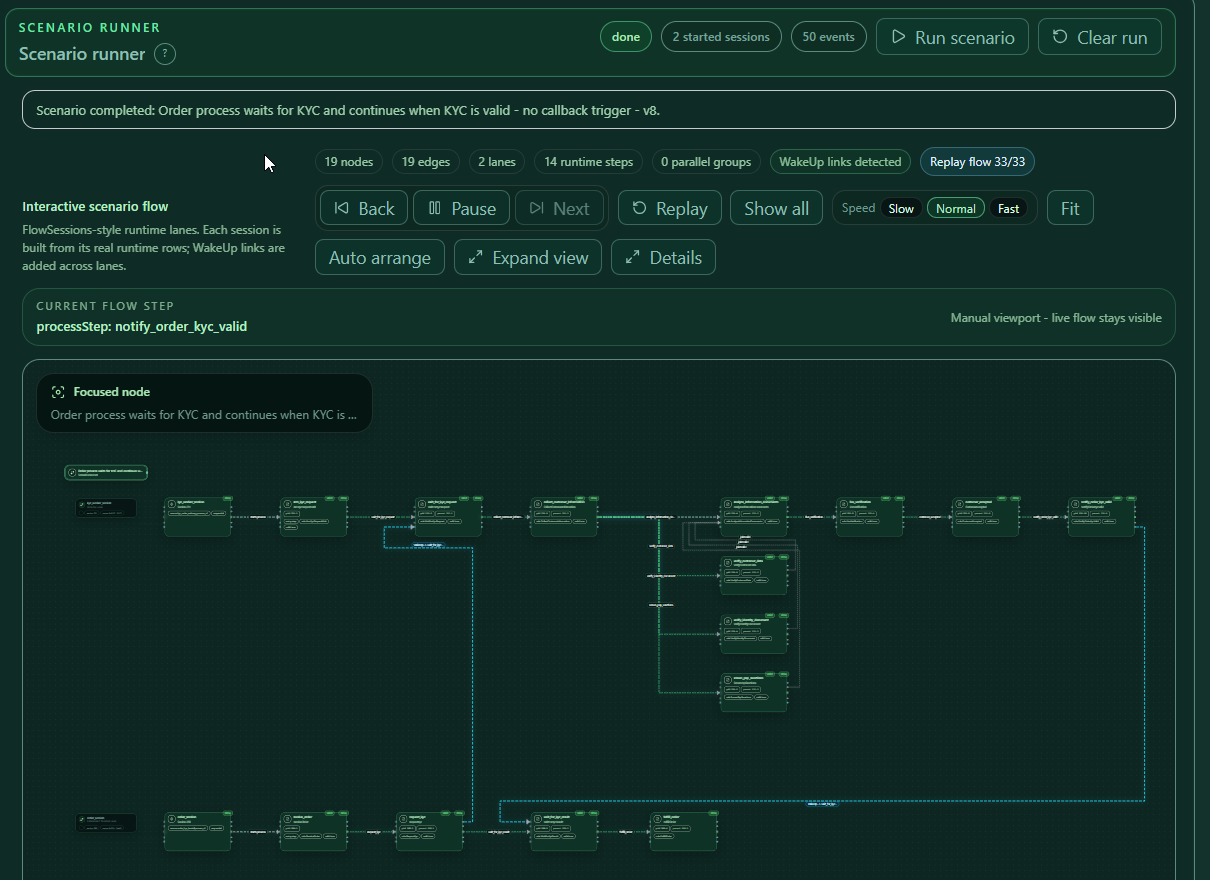
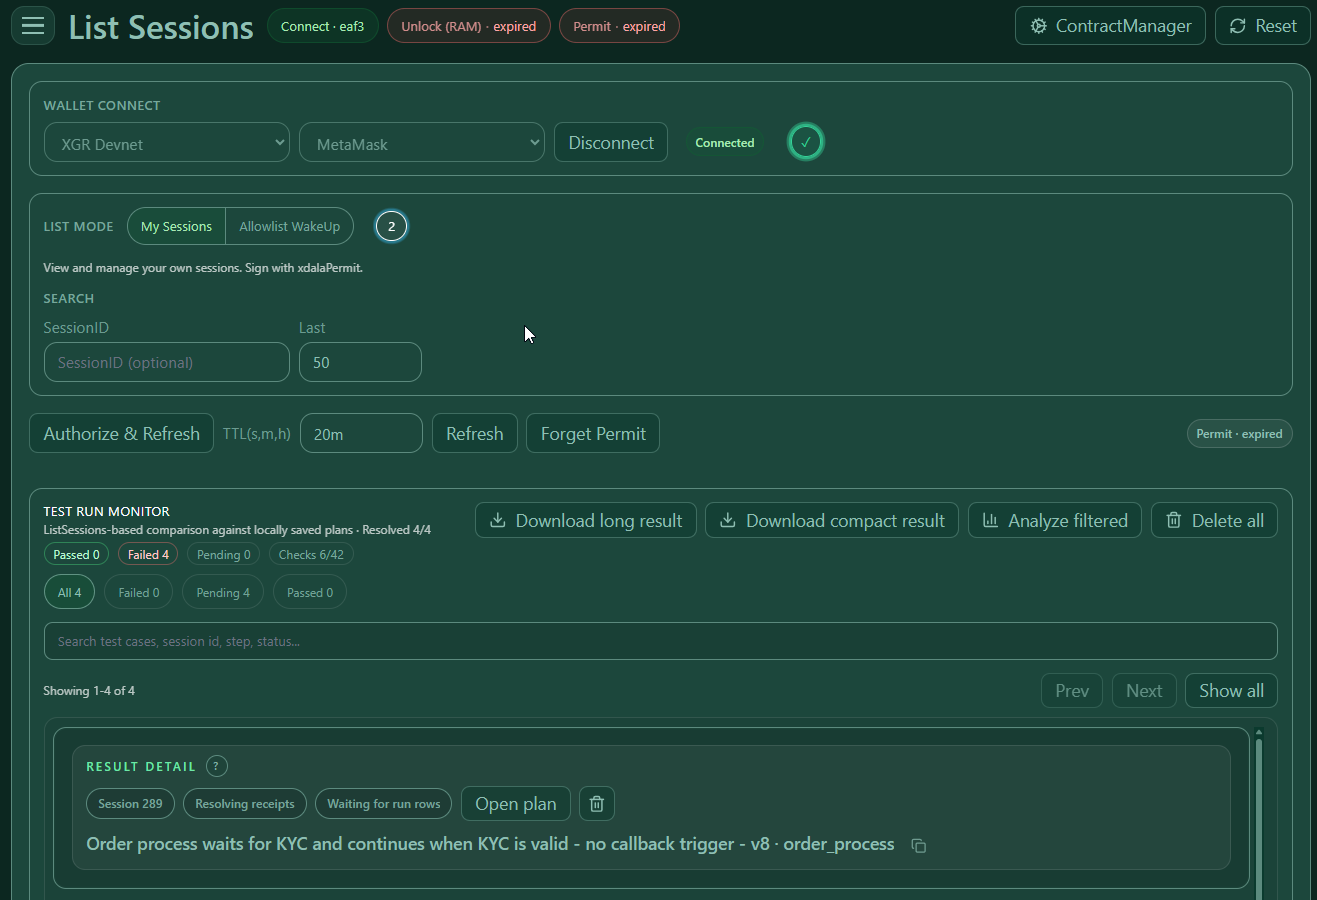
Review scenario results in List Sessions
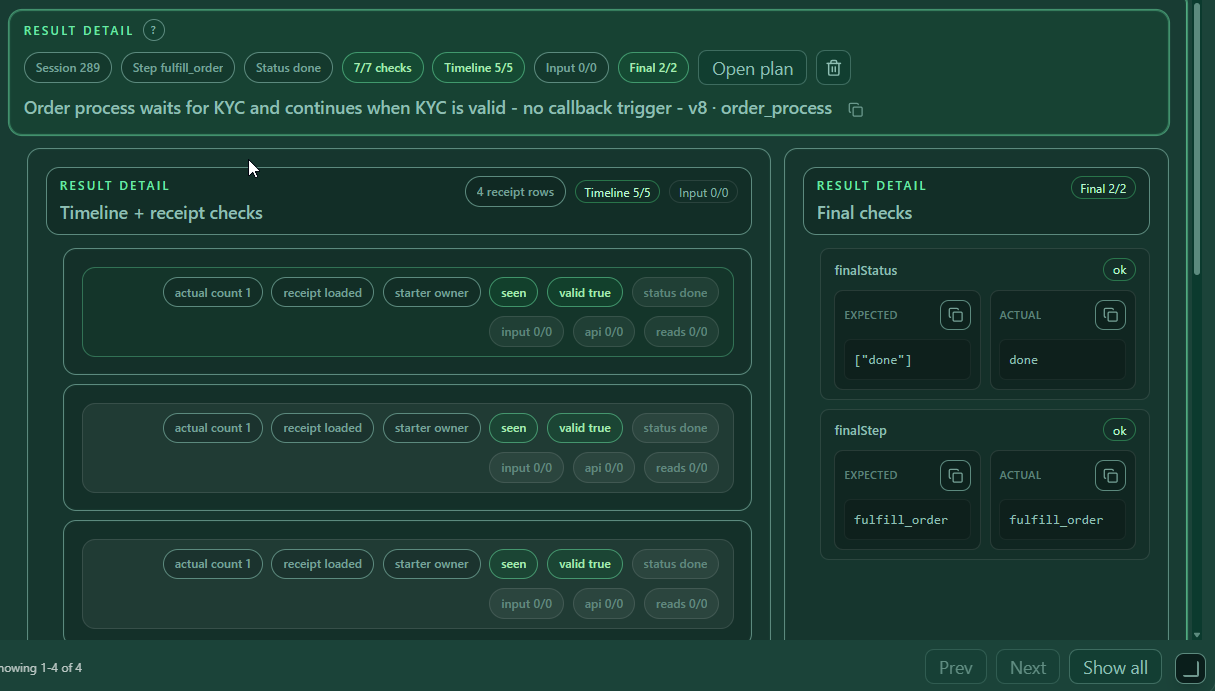
After a scenario run, the results can be inspected in List Sessions and the Testplan monitor. Use this to review the step monitor, receipt details and final status after leaving the scenario runner.
A receipt detail is useful when a step did not pass because it shows the data observed during execution. Use it together with the Test Suite expectations to understand whether the problem is the test definition, the runtime payload or the actual contract/API result.
8. Deploy from Test Suite and return
You can deploy a plan bundle directly from the Test Suite flow.
Steps:
- Select the local plan.
- Open the selected plan action bar.
- Open Export Plan.
- Click Save bundle to Contract Manager or Deploy bundle.
- In BundleDeploy, confirm the bundle.
- Confirm deploy owner alias.
- Deploy.
- Return to Test Suite.
- Use Bundle Sync → Rebind selected if addresses changed.
- Use Validate selected to verify the plan against the new deployed bundle.
- Open in Start Sessions or run the selected plan.
Use this path when the plan still has embedded bundle data and you need fresh deployed addresses before execution. After deployment, rebind/validate keeps the test plan aligned with the deployed contract addresses.
9. Run from the Test Suite
Steps:
- Connect wallet.
- Unlock all alias signers.
- Select the plan.
- Open Run Plan.
- Click Open in Start Sessions.
- Review the runtime draft.
- Start the session.
The review step is important. It is the last place to confirm start step, payload, wakeup allowlist, starter alias and expected result before the session is started.
When the plan contains Runtime → Wakeups, Start Sessions receives the materialized payload.__wakeUp field. Review it before starting the session, especially when an external customer RPC caller is expected to wake the process.
10. Compare results
Use Compare results when you have two exported run bundles and want to see how a candidate run differs from a baseline run.
The compare panel supports:
| Function | What it does |
|---|---|
| Load result → Baseline bundle | Imports the first result bundle. This is normally the older or trusted run. |
| Load result → Candidate bundle | Imports the second result bundle. This is normally the new run you want to check. |
| Download compare report | Downloads a structured comparison report after both sides are loaded. |
| Structured / JSON view | Switches between readable comparison cards and raw JSON diff view. |
| Plan filter | Shows all plans, only plans with differences, only errors, missing partner plans or clean plans. |
| Current plan | Selects the plan pair currently being compared. Plans are matched by title. |
| Step filter | Shows only differences, changed steps, errors, all steps or unchanged steps. |
| Prev / Next | Moves through the filtered plan list. |
| Summary | Shows timeline changes, final changes and scenario changes. |
| Final checks | Compares final status and final step. |
| Scenario assertion compare | Compares scenario-level assertion output when available. |
| Timeline diff | Compares every matched step, including expectation changes and actual observed changes. |
| Expand visible / Collapse visible | Opens or closes the filtered timeline rows. |
The panel matches plans by title. If one side has no matching plan, it shows a missing partner warning.
What to check in a comparison
- Load the old run as Baseline bundle.
- Load the new run as Candidate bundle.
- Use Plan filter → Only plans with differences to focus on changed plans.
- Use Step filter → Only changed steps to focus on changed timeline entries.
- Open changed steps and compare:
- expected payload checks
- expected API saves checks
- expected contract read checks
- actual payload checks
- actual API saves checks
- actual contract read checks
- Download the compare report if the result should be archived or shared.
How to read the output:
- Expectation changed means the configured expected value differs between baseline and candidate.
- Actual changed means the observed runtime result differs between baseline and candidate.
- Left / Right are the two imported result sides.
- Missing partner means a plan title exists in one result bundle but not the other.
- JSON view is useful when structured cards are not detailed enough and you need raw result differences.
11. Analyze results
Use Analyze results when you want to inspect one exported result bundle deeply.
The analysis panel supports:
| Function | What it does |
|---|---|
| Load result bundle | Imports one compact or long result bundle. |
| Download analysis | Downloads a structured analysis JSON for the loaded result bundle. |
| Status summary | Shows overall status and passed/pending/failed plan counts. |
| Plans summary | Shows number of plans and percentage that passed. |
| Assertions summary | Shows passed assertions versus total assertions. |
| Filtered rows | Shows how many rows match the current filters. |
| Categories | Groups findings by category and status. |
| Top findings | Lists the most frequent findings. |
| Status filter | Shows Problems, Failed, Pending, Passed or All. |
| Category filter | Filters by result category. |
| Finding filter | Filters by specific finding reason. |
| Search | Searches title, bundle, session id, current status and current step. |
| Table column filters | Filters plan, category, status, current, checks and finding columns. |
| Result detail | Opens the selected row and shows structured expected-vs-actual data. |
Analyze is best for debugging a single run. It can help find:
- missing steps
- invalid steps
- wrong final step
- wrong final status
- failed input payload checks
- failed API saves checks
- failed contract read checks
- missing or locked aliases
Recommended analysis workflow
- Load the result bundle.
- Start with Problems to see failed or pending rows first.
- Use Category and Finding to narrow the issue type.
- Use table filters if the result bundle is large.
- Open a row to inspect expected versus actual values.
- Download the analysis JSON if the result should be shared with support or stored with a test report.
How to read the analysis:
- Status is calculated from the result findings. Failed findings make the result failed; pending findings make it pending when no failure is present.
- Category is inferred from the result title/bundle text and helps group results, for example XRC-137/API or XRC-729.
- Finding is the reason detected by the analyzer, such as timeline failed, status mismatch, input failed, API failed, contract read failed, final check failed or scenario assertion failed.
- Expected vs actual shows what the plan expected and what the run actually produced.
12. End-to-end recipes
Recipe A: Contract read test
Goal: prove that the helper contract returns 42 and the rule validates.
- Import
xrc137_contractread_value_eq__valid_multi_plan.json. - Select
xrc137_contractread_value_eq__valid. - Open Setup contracts.
- Confirm address key
readContract. - Confirm mode Deploy Solidity.
- Confirm deploy signer alias
owner. - Confirm the Solidity function
getValue()returns42. - Open Runtime → Start setup.
- Confirm start step
A1. - Open Runtime → Payload.
- Enter
AmountA = 50. - Enter
AmountB = 5. - Open Expectations.
- Select
A1 #1. - Add input check
AmountA = 50. - Add input check
AmountB = 5. - Add contract read check
readValue = 42. - Deploy or rebind if needed.
- Open in Start Sessions and run.
Why these steps matter: the setup contract provides the address behind ${addr:readContract}, the runtime payload sends the input values, and the expectations prove that both input data and contract read output match the expected result.
Recipe B: API saves test
Goal: prove that the API response saved Ok = true.
- Import
xrc137_api_slow_json_ok_valid_default_multi_plan.json. - Select
xrc137_api_slow_json_ok_valid_default. - Open Runtime → Start setup.
- Confirm start step
A1. - Keep payload empty.
- Open Expectations.
- Select
A1 #1. - Open API SAVES CHECKS.
- Click Add check.
- Select
Ok. - Select operator
=. - Enter
true. - Save and run.
Why these steps matter: the test does not only check that the session finished. It also checks the decoded API save value from the receipt.
Recipe C: KYC scenario
Goal: run an order process and a KYC worker that wake each other.
- Import the scenario JSON.
- Confirm plans
order_processandkyc_worker. - Prepare alias signer
owner. - Prepare alias signer
owner1. - Start the KYC worker first.
- Wait until the KYC worker is ready.
- Start the order process.
- Let the order process wake the KYC worker.
- Let the KYC worker wake the order result step.
- Assert both sessions.
- Confirm final steps
fulfill_orderandnotify_order_kyc_valid.
Why these steps matter: a scenario verifies coordination between multiple sessions. It checks not only one isolated final result, but also that the sessions wait, wake and finish in the expected sequence.
Recipe D: External RPC wakeup test
Goal: prove that a waiting process can be continued by an external customer/backend RPC caller.
- Import or create a plan with a waiting step, for example
wait_for_customer_approval. - Open Runtime → Start setup.
- Confirm the start step.
- Open Runtime → Payload.
- Enter the normal start payload.
- Open Runtime → Wakeups.
- Switch the wakeup allowlist to Allowlist.
- Open Step-specific Configuration.
- Add the waiting step, for example
wait_for_customer_approval. - Open RPC.
- Add the external caller address.
- Save the plan.
- Open the plan in Start Sessions or run it from the Test Suite.
- Wait until the session reaches the waiting step.
- Send the RPC wakeup from the configured address.
- Verify that the process continues to the expected final step.
- Confirm the result in the Test Run Monitor or List Sessions monitor.
Why these steps matter: this tests the customer-facing wakeup path. It proves that the process is not only wakeable by internal scenario flows, but also by an external system such as a customer backend or AI agent.
13. Troubleshooting
Alias warning before running
Cause: at least one alias referenced by the plan or scenario is missing, has no stored secret, or is locked.
Fix:
- Open Signer context → Alias signers.
- Click Suggest aliases from imported plans.
- Add missing aliases.
- Unlock all required aliases.
- Try again.
API check has no selectable field
The selected step has no API extract alias. Select the correct timeline step or check the imported XRC-137 API extract map. API save checks can only use aliases saved by the underlying XRC-137.
Contract read check has no selectable field
The selected step has no contractReads.saveAs alias. Select the correct step or check the contract read configuration.
Setup contract placeholder is not ready
The plan references ${addr:...} but the matching setup contract is missing or not deployable.
Fix:
- Open Setup contracts.
- Add the missing key.
- Provide Solidity source or fixed address.
- Save.
- Deploy/rebind again.
Run reaches wrong final step
Open Expectations, check Expected final step, then compare timeline entries with the actual result. If the final step expectation is correct but the run ends somewhere else, inspect Analyze results to see the first failed or pending timeline finding.
Wakeup allowlist is missing in Start Sessions
Cause: the plan was edited only in Payload, or the wakeup rules were only configured in a scenario start step and not saved into the embedded plan.
Fix:
- Open the test plan.
- Open Runtime → Wakeups.
- Confirm that the allowlist is enabled.
- Confirm that the target waiting step is configured.
- Save the local plan.
- Open the plan in Start Sessions again.
- Review the materialized
payload.__wakeUp.
External RPC wakeup does not continue the process
Cause: the RPC caller address does not match the configured allowlist, the wrong waiting step was configured, or the process is not yet at the waiting step.
Fix:
- Confirm the process is waiting at the configured step.
- Confirm the address used by the external RPC caller.
- Open Runtime → Wakeups and check the step-specific RPC list.
- Confirm the address is present, or use
All (*)only for a controlled test. - Run again and inspect the receipt details if the process still does not continue.
Internal wakeup does not continue the process
Cause: the allowed actor or the source XRC-137 contract does not match the actual wakeup call.
Fix:
- Check the allowed actor alias in Runtime → Wakeups.
- Confirm the alias exists and is unlocked in Signer context.
- Check From XRC-137 and confirm the referenced contract alias exists in the triggering plan.
- Validate the scenario package again.
- Run again and inspect the waiting step receipt.